Difference between revisions of "Using Flags"
(→Answer) |
X10douglas (talk | contribs) |
||
| (20 intermediate revisions by 3 users not shown) | |||
| Line 1: | Line 1: | ||
== Question == | == Question == | ||
| − | What do Flags do in SmartMacros? | + | '''What do Flags do in SmartMacros?''' |
== Answer == | == Answer == | ||
| + | ===Important Note=== | ||
Problems running macros in X10 SmartMacros Software are often related to transceived house codes. Go into Tools-->Hardware Configuration, and make sure that the House Code for the motion sensor or remote control in question is checked in the lower right corner of the screen. Also, ensure that you run the Tools-->Download Timers and Macros command whenever you are done changing macros. | Problems running macros in X10 SmartMacros Software are often related to transceived house codes. Go into Tools-->Hardware Configuration, and make sure that the House Code for the motion sensor or remote control in question is checked in the lower right corner of the screen. Also, ensure that you run the Tools-->Download Timers and Macros command whenever you are done changing macros. | ||
| + | |||
| + | ===What Flags Are=== | ||
SmartMacros adds two features to ActiveHome Pro: macro conditions and flags. Without conditions, macros always run when the interface receives the macro’s On or Off command. Some sample conditions are: | SmartMacros adds two features to ActiveHome Pro: macro conditions and flags. Without conditions, macros always run when the interface receives the macro’s On or Off command. Some sample conditions are: | ||
| Line 11: | Line 14: | ||
"It`s Nighttime" or "It`s Daytime AND It`s Friday." | "It`s Nighttime" or "It`s Daytime AND It`s Friday." | ||
| − | Flags add global variables into your macro set-up. In computer programming, a global variable is one that can be accessed from any context in a program. Basically, flags let macros communicate with each other. | + | Flags add global variables into your macro set-up. In computer programming, a global variable is one that can be accessed from any context in a program. Basically, flags let macros communicate with each other. You can have one macro set a flag, then add conditions to your other macros so they will run only if that flag is set. |
| + | |||
| + | ===Example=== | ||
| + | |||
| + | ====One Input, Two Actions==== | ||
| + | Bob wants his outdoor motion sensor to sound a chime when he is home. When he is away, he wants the same sensor to turn on two lights. | ||
| + | |||
| + | Normally, Bob would only be able to do ''one'' of these two things since he only has one motion sensor. With Flags, Bob can essentially tell ActiveHome Pro when he is actually in the house and have his system behave differently depending on if he is Home or Away. | ||
| + | |||
| + | Here is how he sets it up: | ||
| + | |||
| + | Bob's ActiveEye motion sensor is set to B1, his Chime is set to A4, and his two lights are set to A5 and A6. Bob also has a Slimline Switch set to B2 which he sticks on the wall near his front door. When Bob leaves his house, he hits B2 ON. When he returns, he hits B2 OFF. | ||
| − | + | First, Bob goes into the Tools menu and selects Preferences. In the SmartMacros tab, he makes sure that Simple or Advanced is checked, not Wizard. | |
| − | + | [[Image:ahp pref.gif]] | |
| − | |||
| − | |||
| − | + | Next, Bob makes five macros (In this example, Bob is using Flag 4 to tell ActiveHome Pro that he is Home "Flag 4 Clear" or Away "Flag 4 Set") | |
| − | |||
| − | |||
| − | + | *The first macro will tell ActiveHome Pro that Bob is Away | |
| − | + | *:[[Image:Flag ex 1.gif]] | |
| − | + | *The second macro will tell ActiveHome Pro that Bob is Home | |
| + | *:[[Image:Flag ex 2.gif]] | ||
| + | *The third macro is what Bob wants his motion sensor to do when he is Home | ||
| + | *:[[Image:Flag ex 3.gif]] | ||
| + | *The fourth macro is what Bob wants his sensor to do when he is Away | ||
| + | *:[[Image:Flag ex 4.gif]] | ||
| + | *The last macro ensures that Bob's lights don't stay on all day | ||
| + | *:[[Image:Flag ex 5.gif]] | ||
| − | + | ====Conditional Timers==== | |
Bob is happy with this, but he would also like his house to look and sound occupied when he is away. He builds some macros at unused house codes: | Bob is happy with this, but he would also like his house to look and sound occupied when he is away. He builds some macros at unused house codes: | ||
| − | M7 On // If Flag 4 Is On // A7 Light On | + | *M7 On // If Flag 4 Is On // A7 Light On |
| − | M7 Off // If Flag 4 Is On // A7 Light Off | + | *:[[Image:Flag ex 6.gif]] |
| − | M8 On // If Flag 4 Is On // A8 Radio On | + | *M7 Off // If Flag 4 Is On // A7 Light Off |
| − | M8 Off // If Flag 4 Is On // A8 Radio Off | + | *:[[Image:Flag ex 7.gif]] |
| + | *M8 On // If Flag 4 Is On // A8 Radio On | ||
| + | *:[[Image:Flag ex 8.gif]] | ||
| + | *M8 Off // If Flag 4 Is On // A8 Radio Off | ||
| + | *:[[Image:Flag ex 9.gif]] | ||
| + | |||
| + | Instead of putting sensors or remotes at M7 and M8, Bob just builds Timers for these macros, scheduling a light and a radio to come on and off at certain times, but only if he is not home. You may want to click on View Advanced Layout in the Timer Designer to access the Security checkbox, which will make timers randomly vary by 20 minutes or so for a lived-in appearance. [[Image:Flag ex 10.gif]] | ||
| + | |||
| + | ====Multiple Camera Recording==== | ||
| + | |||
| + | Here is a more complex script to automatically record 3 cameras based on motion sensors and not stop until motion ceases on all three cameras. This example will not work with the FloodCam. | ||
| + | |||
| + | *A5 On // None //==> Flag 5: SET, Start Video Recording, Switch to Cam B5 | ||
| + | *A6 On // None //==> Flag 6: SET, Start Video Recording, Switch to Cam B6 | ||
| + | *A7 On // None //==> Flag 7: SET, Start Video Recording, Switch to Cam B7 | ||
| + | |||
| + | *A5 Off // If Flags 6 and 7 are Off //==> Stop Video Recording, Set Flag 5 Off // ELSE If Flag 5 Is On// Flag 5: CLEAR | ||
| + | *A6 Off // If Flags 5 and 7 are Off //==> Stop Video Recording, Set Flag 6 Off // ELSE If Flag 6 Is On// Flag 6: CLEAR | ||
| + | *A7 Off // If Flags 5 and 6 are Off //==> Stop Video Recording, Set Flag 7 Off // ELSE If Flag 7 Is On// Flag 7: CLEAR | ||
| + | |||
| + | ====Multiple FloodCam Recording==== | ||
| − | + | This setup is for FloodCams at A5, A6, and A7. | |
| − | + | The first pair of macros lets you disable and enable recording. | |
| − | + | *A3 On// Flag 4: SET | |
| − | + | *A3 Off// Flag 4: CLEAR | |
| − | |||
| − | A5 | + | *A5 On // If Flag 4 is On //==> Flag 5: SET, Start Video Recording |
| + | *A6 On // If Flag 4 is On //==> Flag 6: SET, Start Video Recording | ||
| + | *A7 On // If Flag 4 is On //==> Flag 7: SET, Start Video Recording | ||
| − | A6 Off // If Flags 5 and 7 are Off //==> Stop Video Recording, | + | *A5 Off // If Flags 6 and 7 are Off //==> Stop Video Recording, Flag 5: CLEAR// ELSE If Flag 5 Is On// Flag 5: CLEAR |
| + | *A6 Off // If Flags 5 and 7 are Off //==> Stop Video Recording, Flag 6: CLEAR// ELSE If Flag 6 Is On// Flag 6: CLEAR | ||
| + | *A7 Off // If Flags 5 and 6 are Off //==> Stop Video Recording, Flag 7: CLEAR// ELSE If Flag 7 Is On// Flag 7: CLEAR | ||
| − | |||
[[category: Software]] | [[category: Software]] | ||
Latest revision as of 17:06, 19 May 2016
Question
What do Flags do in SmartMacros?
Answer
Important Note
Problems running macros in X10 SmartMacros Software are often related to transceived house codes. Go into Tools-->Hardware Configuration, and make sure that the House Code for the motion sensor or remote control in question is checked in the lower right corner of the screen. Also, ensure that you run the Tools-->Download Timers and Macros command whenever you are done changing macros.
What Flags Are
SmartMacros adds two features to ActiveHome Pro: macro conditions and flags. Without conditions, macros always run when the interface receives the macro’s On or Off command. Some sample conditions are:
"It`s Nighttime" or "It`s Daytime AND It`s Friday."
Flags add global variables into your macro set-up. In computer programming, a global variable is one that can be accessed from any context in a program. Basically, flags let macros communicate with each other. You can have one macro set a flag, then add conditions to your other macros so they will run only if that flag is set.
Example
One Input, Two Actions
Bob wants his outdoor motion sensor to sound a chime when he is home. When he is away, he wants the same sensor to turn on two lights.
Normally, Bob would only be able to do one of these two things since he only has one motion sensor. With Flags, Bob can essentially tell ActiveHome Pro when he is actually in the house and have his system behave differently depending on if he is Home or Away.
Here is how he sets it up:
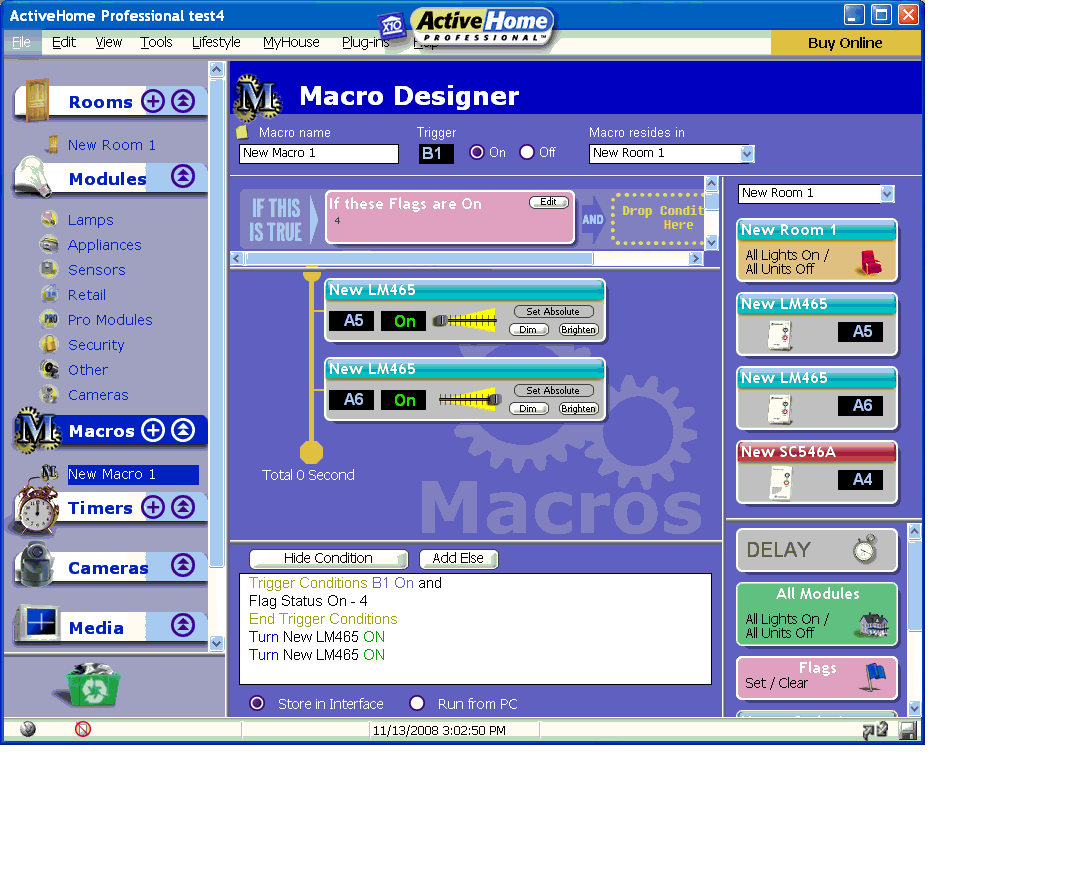
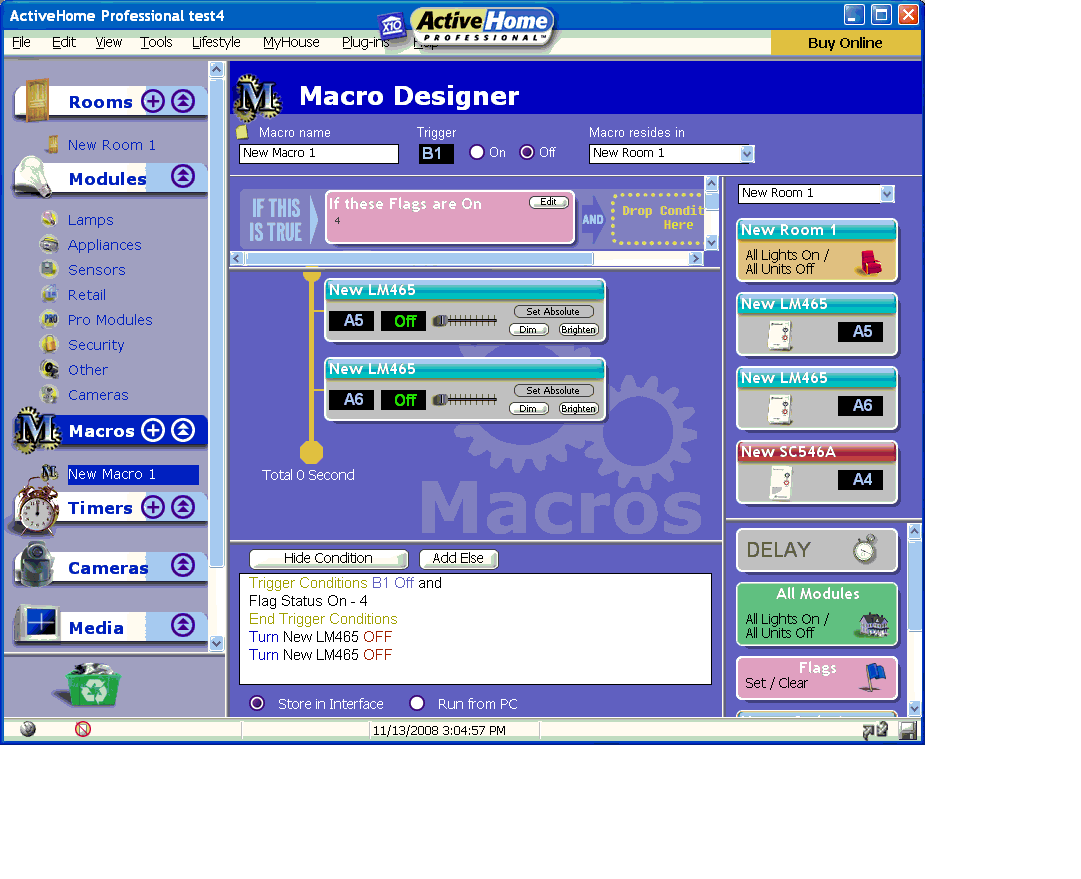
Bob's ActiveEye motion sensor is set to B1, his Chime is set to A4, and his two lights are set to A5 and A6. Bob also has a Slimline Switch set to B2 which he sticks on the wall near his front door. When Bob leaves his house, he hits B2 ON. When he returns, he hits B2 OFF.
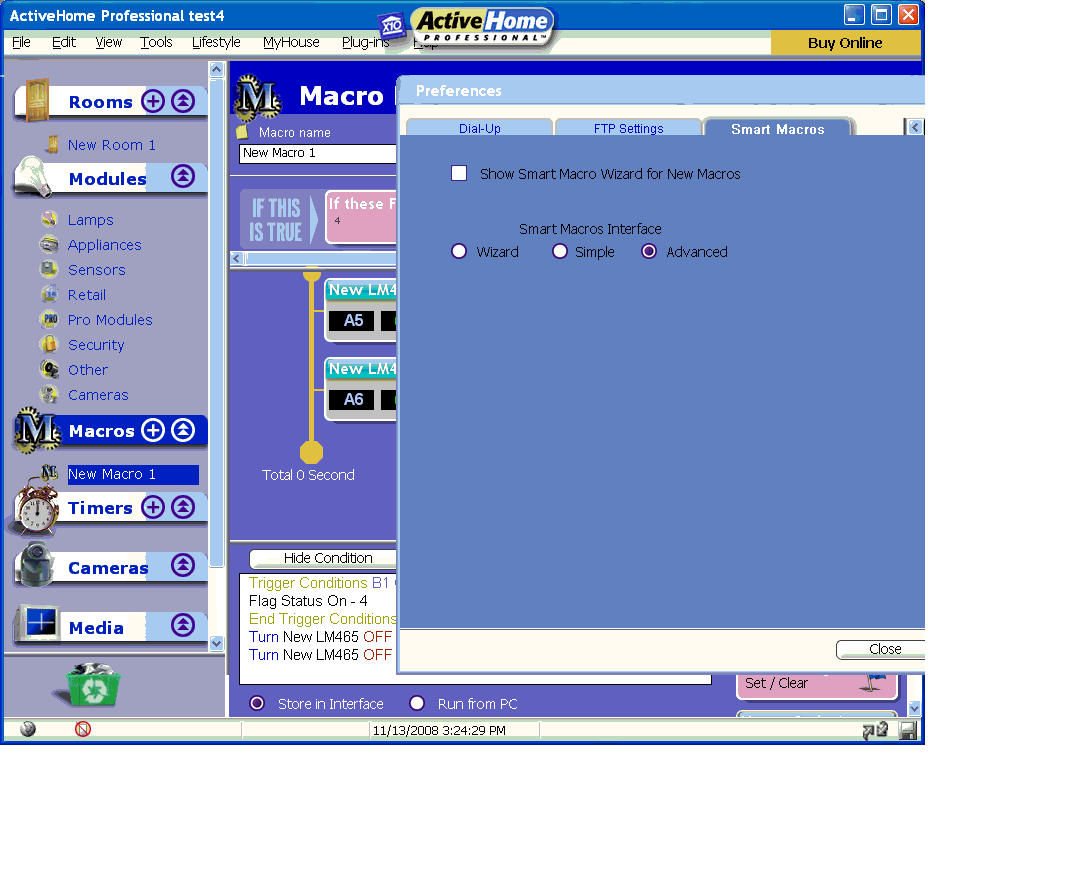
First, Bob goes into the Tools menu and selects Preferences. In the SmartMacros tab, he makes sure that Simple or Advanced is checked, not Wizard.
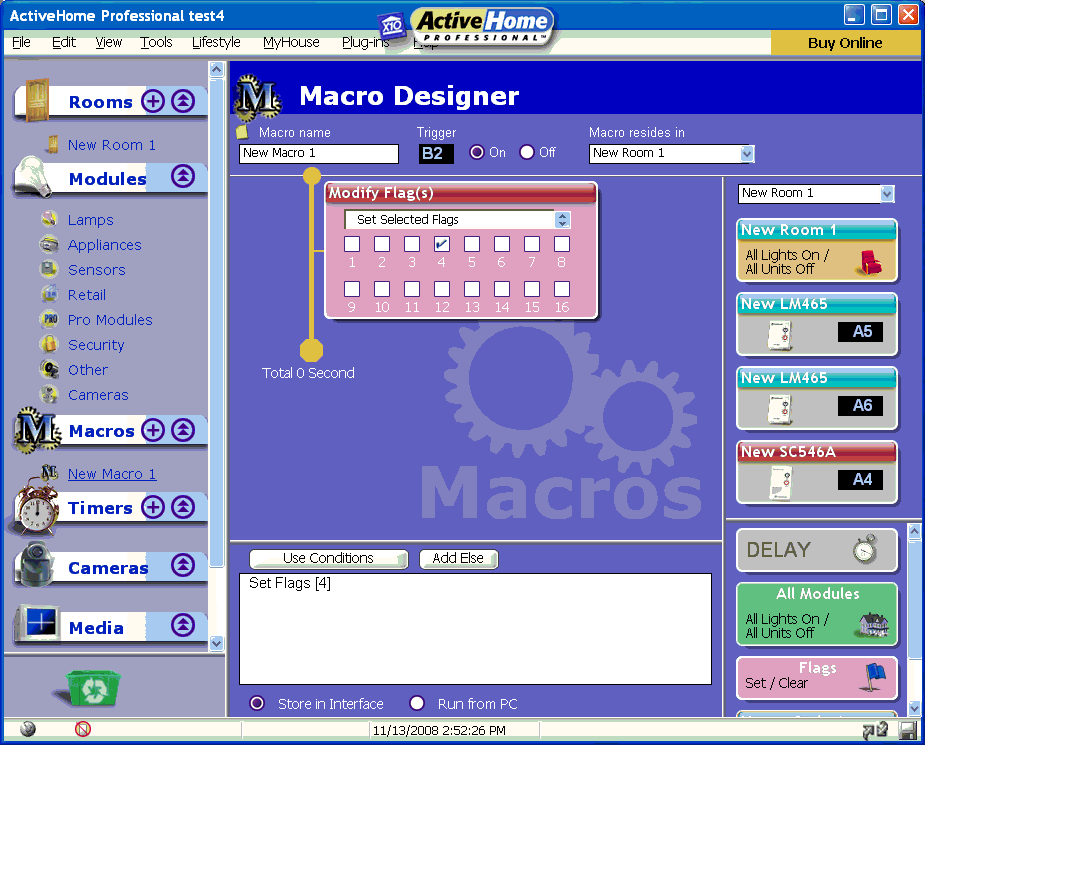
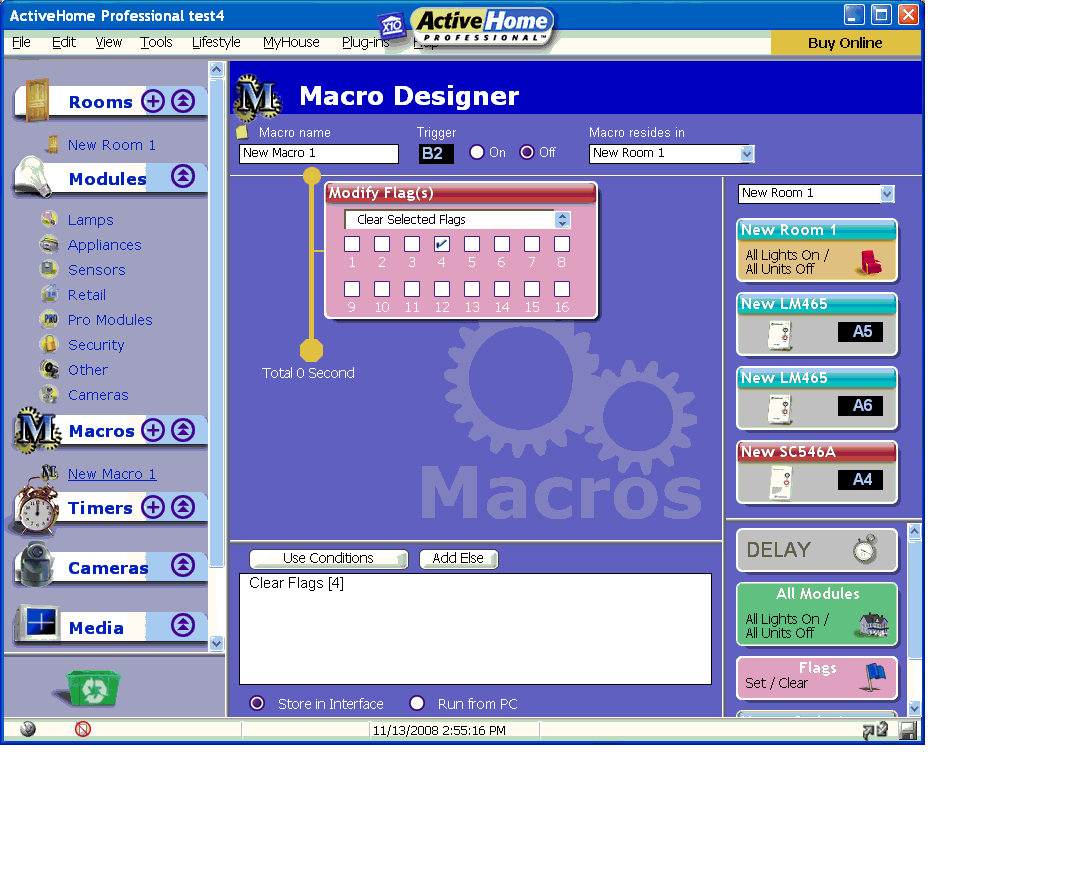
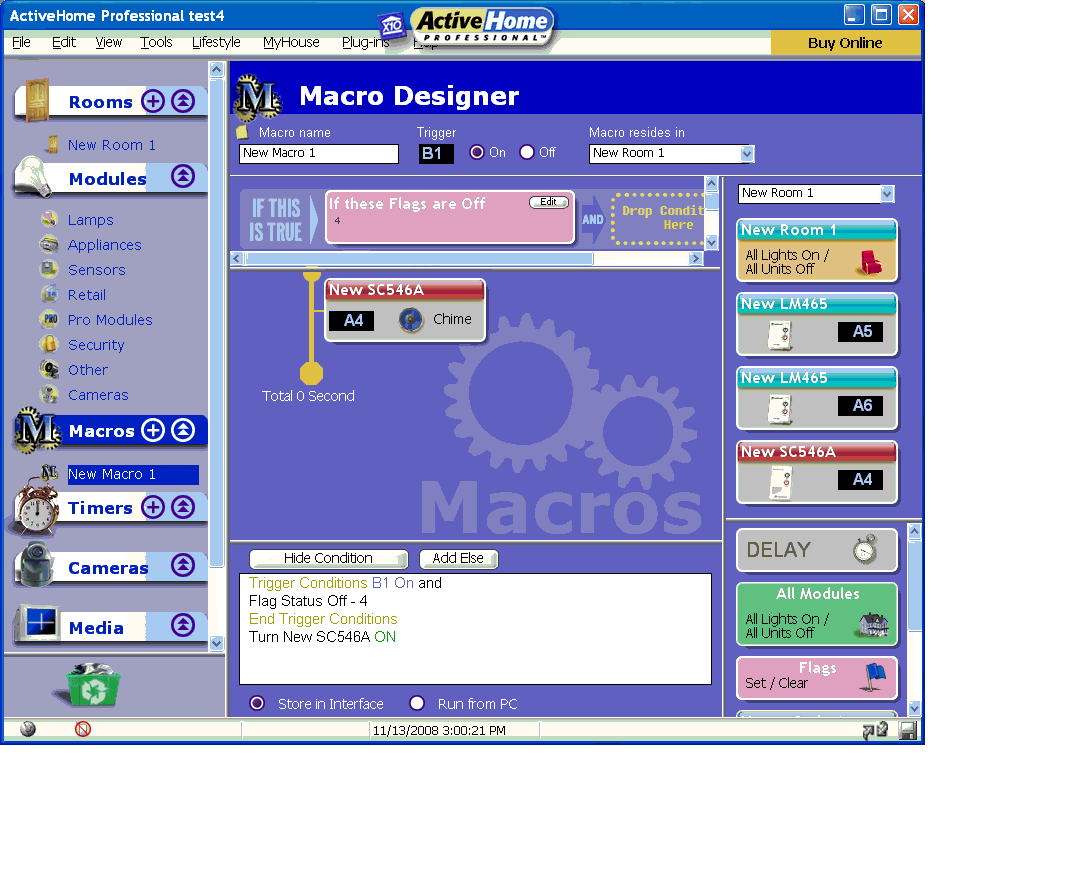
Next, Bob makes five macros (In this example, Bob is using Flag 4 to tell ActiveHome Pro that he is Home "Flag 4 Clear" or Away "Flag 4 Set")
- The first macro will tell ActiveHome Pro that Bob is Away
- The second macro will tell ActiveHome Pro that Bob is Home
- The third macro is what Bob wants his motion sensor to do when he is Home
- The fourth macro is what Bob wants his sensor to do when he is Away
- The last macro ensures that Bob's lights don't stay on all day
Conditional Timers
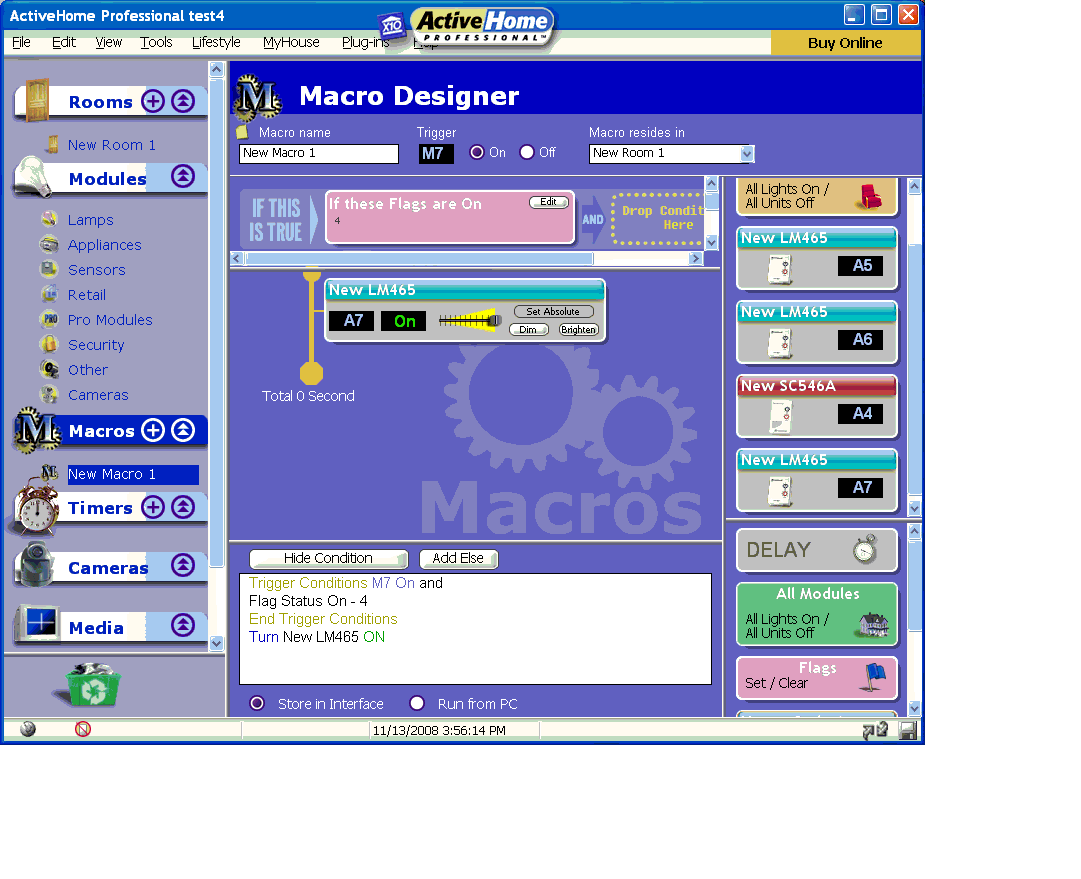
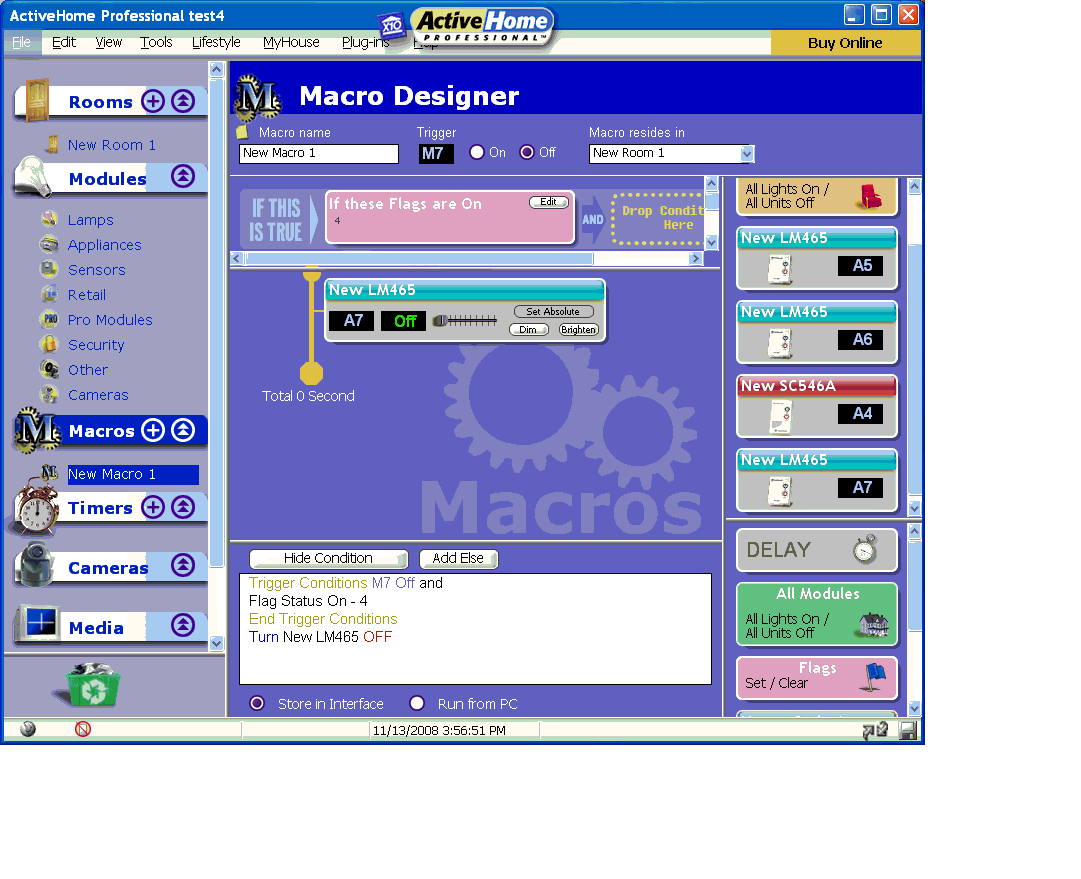
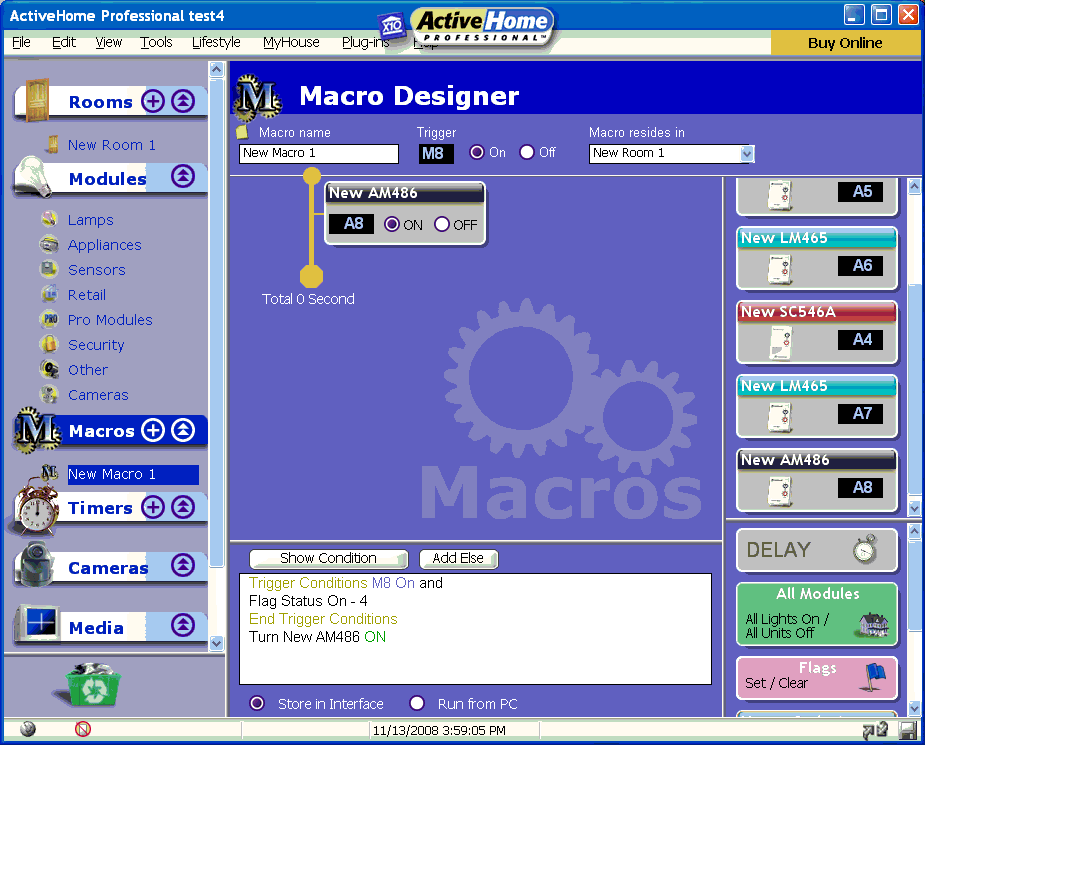
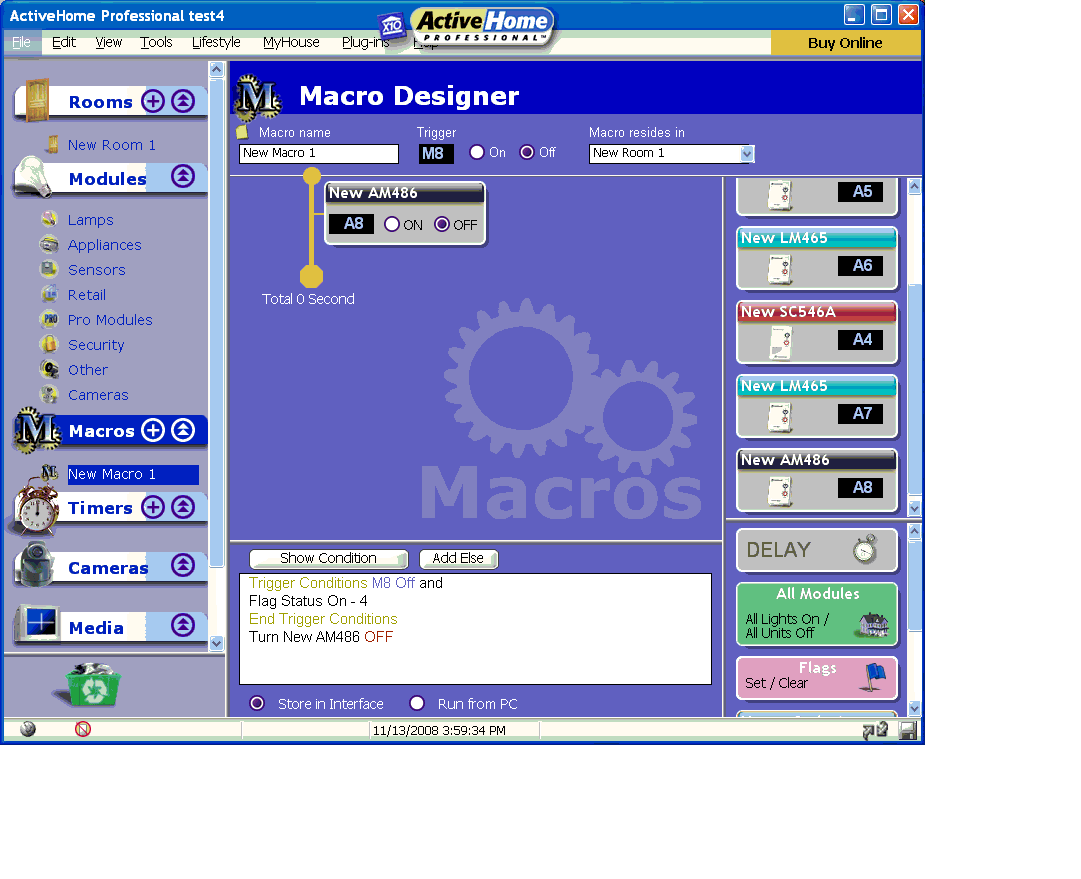
Bob is happy with this, but he would also like his house to look and sound occupied when he is away. He builds some macros at unused house codes:
- M7 On // If Flag 4 Is On // A7 Light On
- M7 Off // If Flag 4 Is On // A7 Light Off
- M8 On // If Flag 4 Is On // A8 Radio On
- M8 Off // If Flag 4 Is On // A8 Radio Off
Instead of putting sensors or remotes at M7 and M8, Bob just builds Timers for these macros, scheduling a light and a radio to come on and off at certain times, but only if he is not home. You may want to click on View Advanced Layout in the Timer Designer to access the Security checkbox, which will make timers randomly vary by 20 minutes or so for a lived-in appearance. 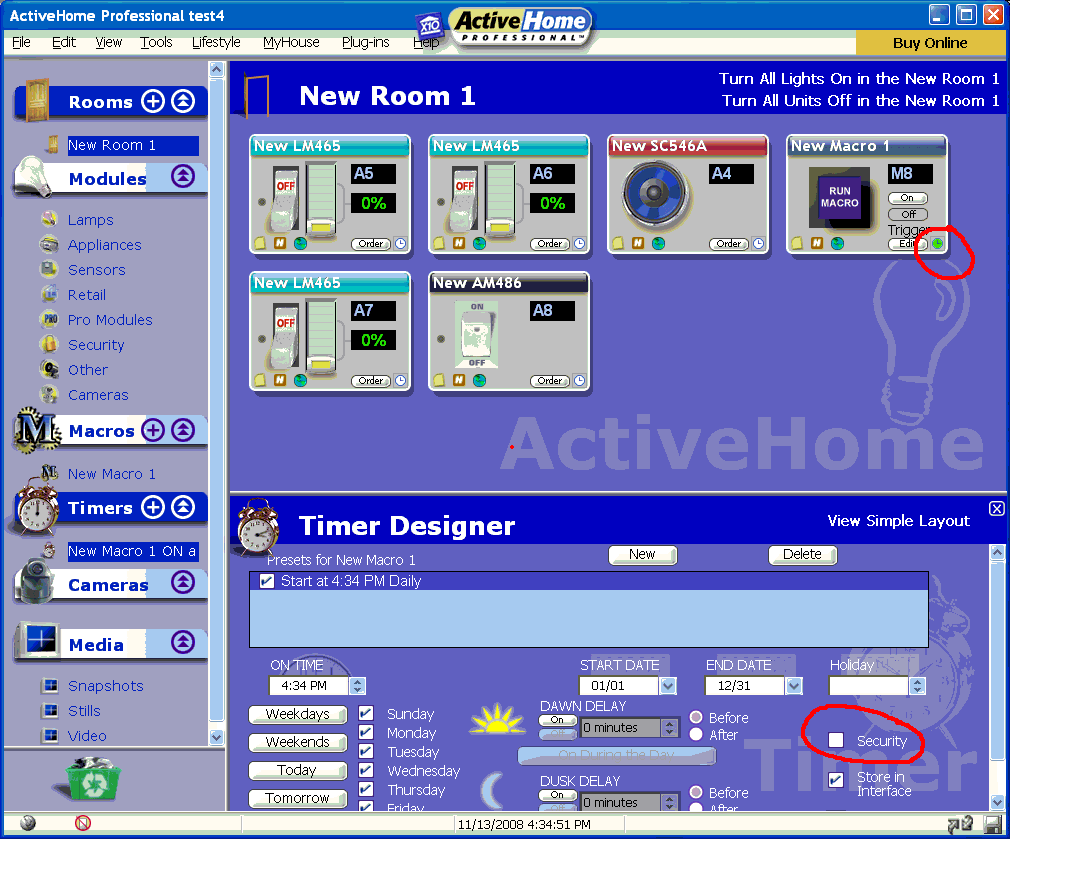
Multiple Camera Recording
Here is a more complex script to automatically record 3 cameras based on motion sensors and not stop until motion ceases on all three cameras. This example will not work with the FloodCam.
- A5 On // None //==> Flag 5: SET, Start Video Recording, Switch to Cam B5
- A6 On // None //==> Flag 6: SET, Start Video Recording, Switch to Cam B6
- A7 On // None //==> Flag 7: SET, Start Video Recording, Switch to Cam B7
- A5 Off // If Flags 6 and 7 are Off //==> Stop Video Recording, Set Flag 5 Off // ELSE If Flag 5 Is On// Flag 5: CLEAR
- A6 Off // If Flags 5 and 7 are Off //==> Stop Video Recording, Set Flag 6 Off // ELSE If Flag 6 Is On// Flag 6: CLEAR
- A7 Off // If Flags 5 and 6 are Off //==> Stop Video Recording, Set Flag 7 Off // ELSE If Flag 7 Is On// Flag 7: CLEAR
Multiple FloodCam Recording
This setup is for FloodCams at A5, A6, and A7.
The first pair of macros lets you disable and enable recording.
- A3 On// Flag 4: SET
- A3 Off// Flag 4: CLEAR
- A5 On // If Flag 4 is On //==> Flag 5: SET, Start Video Recording
- A6 On // If Flag 4 is On //==> Flag 6: SET, Start Video Recording
- A7 On // If Flag 4 is On //==> Flag 7: SET, Start Video Recording
- A5 Off // If Flags 6 and 7 are Off //==> Stop Video Recording, Flag 5: CLEAR// ELSE If Flag 5 Is On// Flag 5: CLEAR
- A6 Off // If Flags 5 and 7 are Off //==> Stop Video Recording, Flag 6: CLEAR// ELSE If Flag 6 Is On// Flag 6: CLEAR
- A7 Off // If Flags 5 and 6 are Off //==> Stop Video Recording, Flag 7: CLEAR// ELSE If Flag 7 Is On// Flag 7: CLEAR
