Difference between revisions of "AirSight HD Getting Started"
| Line 53: | Line 53: | ||
[[Image:XX59ASETUPAPP1.PNG]] | [[Image:XX59ASETUPAPP1.PNG]] | ||
| + | |||
| + | '''Option B: Search for the camera:''' Touch the symbol show below to search for any camera | ||
| + | located on the same LAN as your iPhone or mobile device. You then need to enter the | ||
| + | password manually (default 000000, you can change this later), see Option C below. ). Touch | ||
| + | “Save” to save the camera settings. | ||
Revision as of 19:57, 28 January 2013
Please follow these few simple steps to get started. This might be all you need. You can then look at your owner's manual later for more setup options.
Wired/Wireless IP Camera Quick Installation Guide (Using IE Browser)
Introduction
You can access your camera's live video feed from your web browser or through software on your computer, your tablet, or your smart phone. To access your camera via Ethernet, to your desktop computer - Follow steps 1 – 3. To access your camera via Wi-Fi, to your notebook via Wi-Fi and cell-phone via Wi-Fi - Follow steps 1 – 4. To access your camera via W-Fi, to cell-phone via 3G/4G and computer over the Internet - Follow steps 1- 4 and then see the full owner's manual for dynamic DNS and port forwarding.
Once you have your camera configured, you may access your camera by either of these methods:
- Use the ipcamsetup program on the included CD and click on your camera.
- Once you are viewing your camera's live video, you can save the web address as a favorite. Then you can use that saved favorite without using the ipcamsetup program each time.
- In your web browser, type the IP address of your camera as a new web address.
- To use a friendly name like "mylivingroom.dyndyns.org", see your owner's manual for how to configure your camera to use Dynamic DNS.
- To see your camera over the Internet, or from a cell phone through a 3G/4G connection, see the owner's manual to configure your router for Port Forwarding.
Step 1: Hardware Installation
You need to set up your camera using a network cable (wired) first before you attempt to use it wirelessly.
- Install the Wi-Fi antenna.
- Plug the power adaptor into the camera and into an AC outlet.
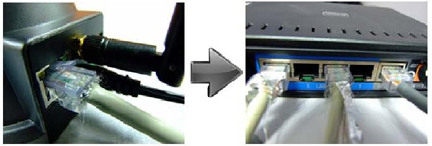
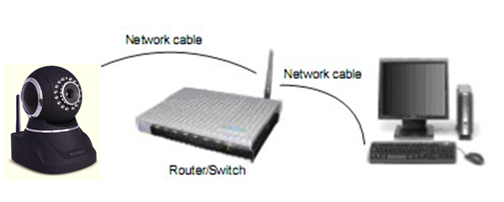
- Plug one end of the network cable into the camera, and the other end into your router/switch.
Step 2: Software Installation
Download the FREE App (P2PCam264) from the Apple App store (or Google Play store).
Note: The iPhone/iPad App and Android mobile device setup are similar, this manual uses the iPhone/iPad App as an example.
1. Add camera:
Option A: Add a camera via QR Code. This method makes setup extremely fast and easy.
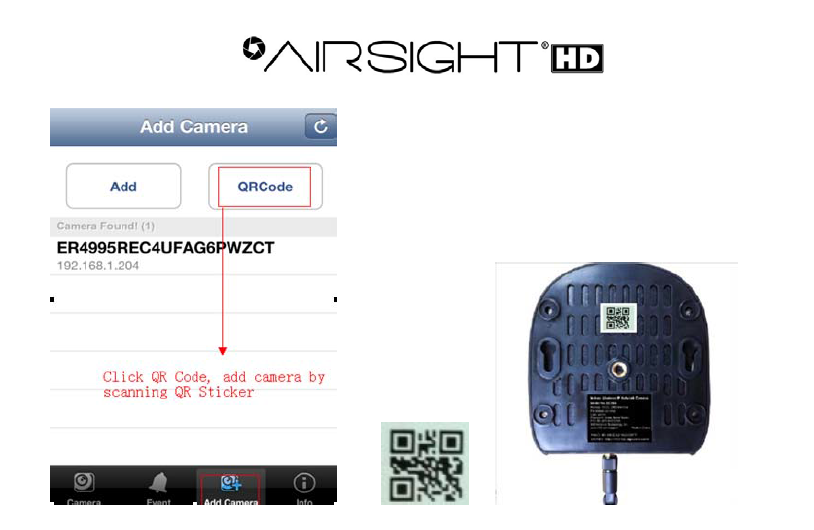
Run the App and touch QR Code on the Add Camera screen (shown on the next page). The App will auto-open your phone’s camera.
Scan (i.e., take a photo of) the QR code in the bottom of the camera, the App will add the camera automatically. You then need to enter the password manually (default 000000, you can change this later), see Option C below. ). Touch “Save” to save the camera settings.
Option B: Search for the camera: Touch the symbol show below to search for any camera located on the same LAN as your iPhone or mobile device. You then need to enter the password manually (default 000000, you can change this later), see Option C below. ). Touch “Save” to save the camera settings.


