Difference between revisions of "NEW Alarm Input Armed / IO Linkage on Alarm"
Jump to navigation
Jump to search
X10douglas (talk | contribs) (Created page with "== Question == How do I setup my Airsight HD Cameras to use Alarm Input Armed / IO Linkage on Alarm? ---- == Answer == '''If you want to connect external alarm devices:'''...") |
X10douglas (talk | contribs) |
||
| Line 11: | Line 11: | ||
*Set the ALARM DURATION | *Set the ALARM DURATION | ||
*Select ON from the LOSE SD-CARD ALARM drop down menu if you'd like to be notified, via your external alarm device, in the event the optional SDCard is removed. | *Select ON from the LOSE SD-CARD ALARM drop down menu if you'd like to be notified, via your external alarm device, in the event the optional SDCard is removed. | ||
| − | *For an alarm '''INPUT''' device, choose ENABLE, next to | + | *For an alarm '''INPUT''' device, choose ENABLE, next to ALARM INPUT and then indicate whether the external device uses a N.O. (normally open) or N.C. (normally closed) relay to trigger the alarm. |
| − | *For an alarm '''OUTPUT''' device, choose the appropriate actions under | + | *For an alarm '''OUTPUT''' device, choose the appropriate actions under LINKAGE WITH ALARM to enable it. |
*Optionally, you can also designate days and times you want your external alarm settings to be turned on by checking SCHEDULE | *Optionally, you can also designate days and times you want your external alarm settings to be turned on by checking SCHEDULE | ||
*Click SAVE | *Click SAVE | ||
| + | |||
| + | [[File:NEWALARM.png]] | ||
| + | |||
Revision as of 22:07, 11 January 2016
Question
How do I setup my Airsight HD Cameras to use Alarm Input Armed / IO Linkage on Alarm?
Answer
If you want to connect external alarm devices:
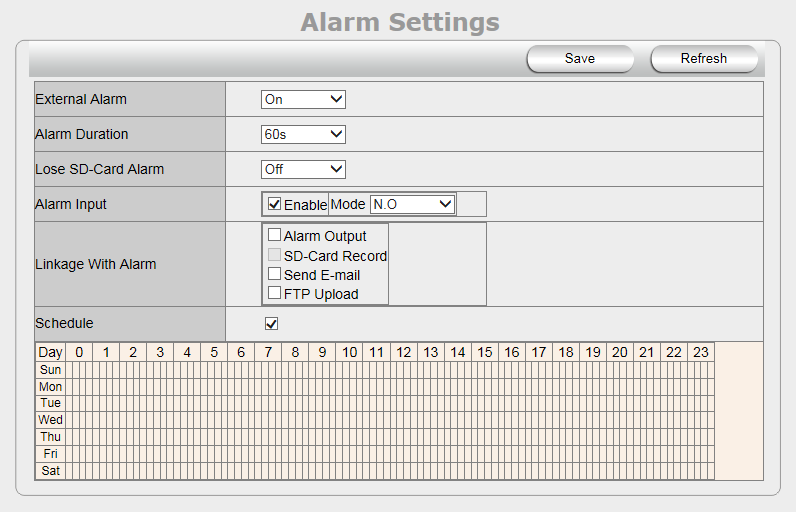
- Check EXTERNAL ALARM to turn this feature ON/OFF
- Set the ALARM DURATION
- Select ON from the LOSE SD-CARD ALARM drop down menu if you'd like to be notified, via your external alarm device, in the event the optional SDCard is removed.
- For an alarm INPUT device, choose ENABLE, next to ALARM INPUT and then indicate whether the external device uses a N.O. (normally open) or N.C. (normally closed) relay to trigger the alarm.
- For an alarm OUTPUT device, choose the appropriate actions under LINKAGE WITH ALARM to enable it.
- Optionally, you can also designate days and times you want your external alarm settings to be turned on by checking SCHEDULE
- Click SAVE
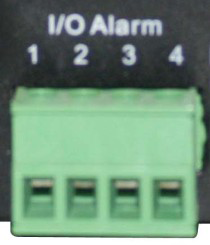
IO Pins for IO Alarm Linkage
I/O PINS:
- Output
- Output
- Alarm Input
- Input (GND)
Output pins: Output pins (1 & 2) can be used to enable IO linkage on alarm.
- For example, you might connect an external siren to sound when motion is detected.
- You can also manually control the output switches via the WebUI buttons
 &
&  to turn the connected device ON/OFF.
Input pins: Input pins (3 & 4) can be used for 1-way external sensor input to the camera.
- For example, you might connect an external Passive Infrared (PIR) Sensor to it triggered the camera to send an e-mail and/or trigger the siren attached to the Output Pins (above).
- If you link an external alarm device to Pins 3 and 4, when Alarm Input Enable is selected, the external alarm is armed.
NOTE: All pins work as a switch only.

