New Quick Start Guide
Quick Start Guide for XX51A XX52A, XX59A, and XX60A P2P Cameras
Thank you for choosing AirSight as your IP WIFI Camera!

This guide is designed to help you setup your camera and view wirelessly on your Apple or Android device.
- Setup is simple and takes only minutes.
SET UP THE HARDWARE
You need to set up your camera using a network cable (wired) first before you attempt to use it wirelessly.
- Attach the Wi-Fi antenna to the camera.
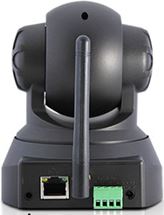
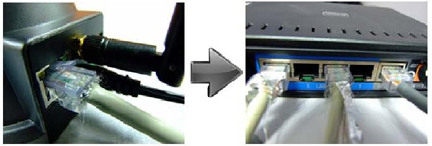
- Plug one end of the network cable into the camera, and the other end into your router/switch.
- Plug the included power adapter into the camera and into an AC outlet for power.


SET UP THE SOFTWARE (iOS and Android)
- Download the FREE App "IP Camera Viewer for X10 Airsight" - iPhone App Store | Android Google Play - (**New XX51A, XX52A, and XX59A Only**)

- Tap the
 "Add Camera" tab at the bottom of the screen

- After a few seconds your camera should automatically appear in the "Camera Found!" list

- Tap the camera in the list to access the ADD CAMERA MENU

- NAME: This can be any name of your choosing - "Camera" is the default name.
- UID: This is the camera's unique P2P ID and should not be changed.
- PASSWORD: The default password is six zeros 000000 - this can be changed later in the ADVANCED SETTINGS MENU
- Once your password has been entered tap SAVE.
- Click the
 "Camera" tab at the bottom of the screen
- Tap on your camera in the CAMERA LIST to view your camera

GO WIRELESS
1) While the camera is still plugged into the router go to the CAMERA tab
2) Click the  button to the right of your camera's name.
3) Go to "Advanced Settings

4) Select "WiFi"

5) Choose your WiFi network from the list and input your password.

6) Tap JOIN to save the WiFi details
7) Tap BACK to exit the WIFI NETWORKS menu
8) Tap BACK to exit the ADVANCED SETTINGS menu
9) Tap BACK to exit the EDIT CAMERA menu
10) Power Down your camera by unplugging the camera's AC adapter.

11) Unplug camera from the network cable.

12) Wait a few moments, then plug your camera's AC adapter back into your camera.

13) Allow a few minutes for the camera to fully reboot.

14) Once your camera has finished centering itself - tap your camera in the CAMERA tab.
15) You are now Wireless!
