XX52AGettingStarted
Please follow these few simple steps to get started. This might be all you need. You can then look at your owner's manual later for more setup options.
XX52A Outdoor Wired/Wireless IP Camera Quick Installation Guide (Using IE Browser)

Introduction
You can access your camera's live video feed from your web browser or through software on your computer, your tablet, or your smart phone.
To access your camera via Ethernet, to your desktop computer - Follow steps 1 – 3.
To access your camera via Wi-Fi, to your notebook via Wi-Fi and cell-phone via Wi-Fi - Follow steps 1 – 4.
To access your camera via W-Fi, to cell-phone via 3G/4G and computer over the Internet - Follow steps 1- 4 and then see the full owner's manual for dynamic DNS and port forwarding.
Once you have your camera configured, you may access your camera by either of these methods:
- Use the ipcamsetup program on the included CD and click on your camera.
- Once you are viewing your camera's live video, you can save the web address as a favorite. Then you can use that saved favorite without using the ipcamsetup program each time.
- In your web browser, type the IP address of your camera as a new web address.
- To use a friendly name like 'mylivingroom.dyndyns.org', see the owner's manual for how to configure your camera to use Dynamic DNS.
- To see your camera over the Internet, or from a cell phone through a 3G/4G connection, see your owner's manual to configure your router for Port Forwarding.
Step 1: Hardware Installation
You need to set up your camera using a network cable (wired) first before you attempt to use it wirelessly. It is recommended that you set the camera up indoors first, before routing the cables through an external wall to mount it outdoors.
- Install the Wi-Fi antenna.
- Plug the power adaptor into the camera and into an AC outlet.
- Plug one end of the network cable into the camera, and the other end into your router/switch.


Step 2: Software Installation

Install the following software:
- IP Camera Tool: Open the CD, click “IPCamSetup.exe”—“Next”—“Next”—“Close”.
- ActiveX: Click “Appinstall.exe”—“Next”—“Install”—“Finish”.
After this is done, the icon “IP Camera Tool” ![]() will be displayed on your desktop.
will be displayed on your desktop.
Step 3: Real-time Video Demonstration
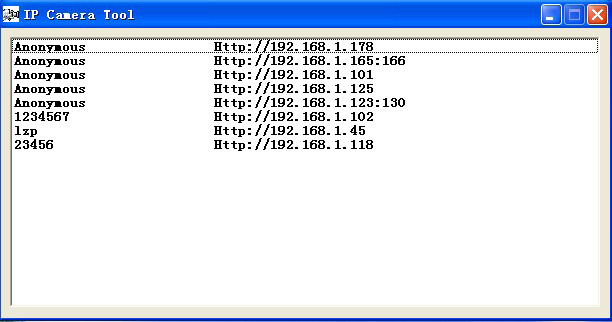
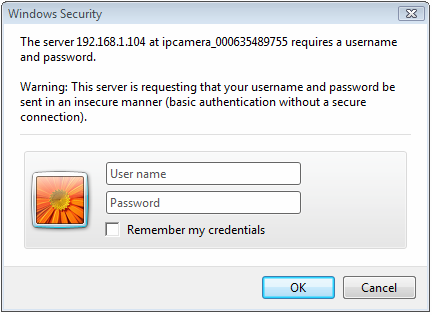
- Login: Double click “IP Camera Tool” icon on your desktop, search the IP address, choose the one for your camera, double click to go to IE login interface.
- Default username: admin
- Password: no password
- Choose the language: English, Spanish, etc.
- Choose the work mode. IE browser: choose ActiveX mode. Safari, Firefox, Google chrome browser: Server push mode/ VLC mode. Mobile phone: sign in mobile phone mode.
- Sign in. Click Sign In, then can get video in real-time.


Note: If there is no picture shown in IE Browser
If using IE browser to connect to the camera for the first time, and there is no image displayed, there will be an ActiveX prompt, please click the prompt and choose Run Add-on, refresh the IE interface, and login to the camera again, then you will see live video.


If there is still no live video after you run ActiveX, please try to enable the ActiveX options of IE security settings, please do the follow steps:
- Close your computer’s Firewall.
- Change the ActiveX settings, “IE” browser > “Tool” > “Internet Options” > “Security”> “Custom Level” > “ActiveX control and Plug-ins”, all the ActiveX options should be set to be “Enable”: Especially:
- Enable: Download unsigned ActiveX controls
- Enable: Initialize and script ActiveX controls not marked as safe
- Enable: Run ActiveX controls and plug-ins


In Addition: you can also click “start” select “Internet Explorer”, choose “Internet attributes “ to enter, or via “Control Panel” “Internet Explorer”, enter for Security settings. If there is still no image, please close your anti-virus software, and then try steps 1 & 2 again.
Step 4: How to use your camera Wirelessly
You should set up your camera using a network cable (wired) first before you attempt to use it wirelessly. (See Hardware Installation above).
- Make sure your router is a wireless router.
- Make sure the Wi-Fi antenna is installed on the camera.
- Determine if your router uses encryption, (see your router’s owner’s manual for how to do this), if it uses encryption, note the share key.
- Login to the camera using the IP Camera Tool, like you did when setting up with a network cable.
- When you see the screen below, click “Network” then ”Wireless Lan Settings” then click on “Scan”, wait and then click it again, when you see your camera in the Wireless LAN settings box, click on it.
- If there is no encryption, just click “Submit”, if there is encryption, input the share key, then click “Submit”.
- Unplug the network cable and wait about 30 seconds while the camera reboots.


For more operation details, please check the full version of the user manual for your IP camera or visit http://www.x10.com/support
You can also vsit the following site for useful information regading remote viewing of IP cameras:
http://ipcamnetwork.wordpress.com/2010/09/23/acessing-your-camera-from-the-internet/
Wired/Wireless IP Camera Quick Installation Guide (Using P2P Application)
Please go to the Apple App Store (or Google Play store) and download the latest version of the FREE App called:
![]()
P2PCamLive

Wired/Wireless IP Camera Quick Installation Guide (Using IE Browser)
Introduction
You can access your camera's live video feed from your web browser or through software on your computer, your tablet, or your smart phone. To access your camera via Ethernet, to your desktop computer - Follow steps 1 – 3. To access your camera via Wi-Fi, to your notebook via Wi-Fi and cell-phone via Wi-Fi - Follow steps 1 – 4. To access your camera via W-Fi, to cell-phone via 3G/4G and computer over the Internet - Follow steps 1- 4 and then see the full owner's manual for dynamic DNS and port forwarding.
Once you have your camera configured, you may access your camera by either of these methods:
- Use the ipcamsetup program on the included CD and click on your camera.
- Once you are viewing your camera's live video, you can save the web address as a favorite. Then you can use that saved favorite without using the ipcamsetup program each time.
- In your web browser, type the IP address of your camera as a new web address.
- To use a friendly name like "mylivingroom.dyndyns.org", see your owner's manual for how to configure your camera to use Dynamic DNS.
- To see your camera over the Internet, or from a cell phone through a 3G/4G connection, see the owner's manual to configure your router for Port Forwarding.
Step 1: Hardware Installation
You need to set up your camera using a network cable (wired) first before you attempt to use it wirelessly.
- Install the Wi-Fi antenna.
- Plug the power adaptor into the camera and into an AC outlet.
- Plug one end of the network cable into the camera, and the other end into your router/switch.


Step 2: Software Installation
Wired/Wireless IP Camera Quick Installation Guide (Using P2P Application)
Download the FREE App (P2PCamLive) from the Apple App store for iPhone or the Google Play store for Android phones.

Note: The iPhone/iPad App and Android mobile device setup are similar, this manual uses the iPhone/iPad App as an example.
1. Add camera:
Option A: Add a camera via QR Code. This method makes setup extremely fast and easy.
Run the App and touch QR Code on the Add Camera screen (shown on the next page). The App will auto-open your phone’s camera.
Scan (i.e., take a photo of) the QR code in the bottom of the camera, the App will add the camera automatically. You then need to enter the password manually (default 000000, you can change this later), see Option C below. ). Touch “Save” to save the camera settings.
Option B: Search for the camera: Touch the symbol show below to search for any camera
located on the same LAN as your iPhone or mobile device. You then need to enter the
password manually (default 000000, you can change this later), see Option C below. ). Touch
“Save” to save the camera settings.

Option C: Add a camera manually: You can touch “Add” to add the camera manually. Enter a name for the camera, the P2P User ID (found on the bottom of the camera), and the password (default 000000, you can change this later). Touch “Save” to save the camera settings. Note, you can add up to 4 cameras in the mobile App (more when using a browser).
2. Connect Camera:
Touch the Camera icon to connect to (view) the camera.

3. Operate Camera:
You can zoom in and out by pinching your fingers on the screen.
You can take a snapshot, save the picture, and listen and talk with two-way audio:
 Touch to take and save a snapshot.
 Touch to see the saved snapshot.
 Touch to listen to or speak through the camera.

Listen: Touch to hear what happens near where the camera placed. Speak: Touch to speak through the camera. Mute: Touch to mute the audio. Dismiss: Touch to go back to the video screen.
Advance Settings:

Security Code: Touch to change your password.

Video Quality: Touch to change the video settings. This will be affected by your bandwidth, you can select from Max to Min according to your network conditions, to ensure smooth viewing of the camera.

Video Flip: You can flip the image depending on how your camera is mounted. For example: if your camera is hung from the ceiling, you can choose “Vertical Flip”.

Environment Mode: Choose a mode to adjust depending on where the camera is located. For example: if the camera is located indoors, choose “Indoor Mode (60Hz). If the camera is located outside the house, choose “Outdoor Mode”. This will ensure the camera has the best video quality.

Motion Detection: Change the motion diction sensitivity level, or turn off motion detection.

About Device: Check camera information here.

4. Check motion detection record: If you touch “Event” you will see when motioned detection was triggered.


App. Info. Touch “Info.” to view the App version.
