Difference between revisions of "MultiView Technical Setup"
X10douglas (talk | contribs) |
X10douglas (talk | contribs) |
||
| (One intermediate revision by the same user not shown) | |||
| Line 9: | Line 9: | ||
{| width="100%" | {| width="100%" | ||
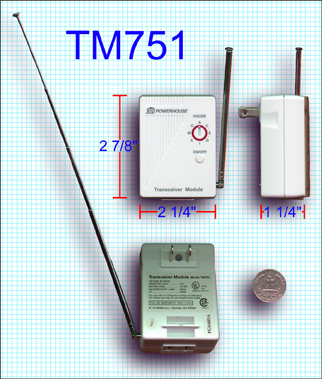
| − | |(1) Transceiver (TM751 or RR501) || | + | |(1) Transceiver (TM751 or RR501) || [[Image:tech_tm751.jpg]] |
|- | |- | ||
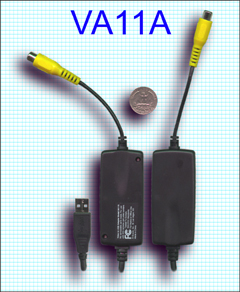
| − | |(1) USB Video Capture Cable (VA10A or VA11A) || | + | |(1) USB Video Capture Cable (VA10A or VA11A) || [[Image:tech_va11a.jpg]] |
|- | |- | ||
|(1) Wireless XCam with Addressable Power Supply || - | |(1) Wireless XCam with Addressable Power Supply || - | ||
|- | |- | ||
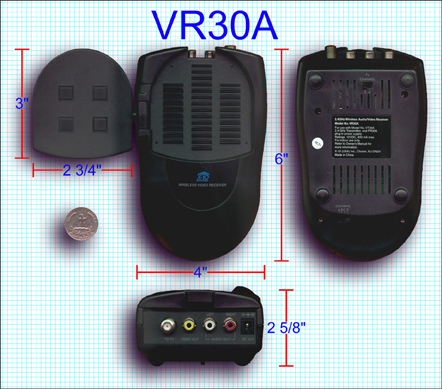
| − | |(1) Video Receiver (VR36A or VR31A) || | + | |(1) Video Receiver (VR36A or VR31A) || [[Image:tech_vr30a.jpg]] |
|- | |- | ||
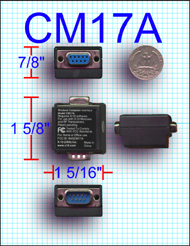
| − | |(1) Firecracker Computer Interface (CM17A or CM19A) || | + | |(1) Firecracker Computer Interface (CM17A or CM19A) || [[Image:tech_cm17a.jpg]] |
|} | |} | ||
Once your cameras have been configured and tested, connect the RCA Video Out jack on the Video Receiver to one end of an RCA cable. Connect the other end to the RCA Video In jack on the USB Video Capture Cable. | Once your cameras have been configured and tested, connect the RCA Video Out jack on the Video Receiver to one end of an RCA cable. Connect the other end to the RCA Video In jack on the USB Video Capture Cable. | ||
| + | |||
==Setup== | ==Setup== | ||
| + | |||
| + | |||
===Configuring the Firecracker Computer Interface=== | ===Configuring the Firecracker Computer Interface=== | ||
| + | |||
*If you have the CM17A, connect the female serial connector on the Firecracker Interface directly to your PC's serial port. If you have the CM19A, plug the USB connector directly into a free USB port on your computer. | *If you have the CM17A, connect the female serial connector on the Firecracker Interface directly to your PC's serial port. If you have the CM19A, plug the USB connector directly into a free USB port on your computer. | ||
| − | + | [[Image:cm17aconnection.jpg]] | |
| + | |||
*If you have the CM19A you can skip the following step. If you own an MR26A PC Receiver, it can be connected to the male serial port connector (pass-through port) on the Firecracker Interface. | *If you have the CM19A you can skip the following step. If you own an MR26A PC Receiver, it can be connected to the male serial port connector (pass-through port) on the Firecracker Interface. | ||
| Line 32: | Line 37: | ||
'''Note:''' You may connect other serial devices to the pass-through port of the CM17A serial Firecracker Interface; however, if the device operates all the time (mouse, modem, etc.), the Firecracker Interface will not operate properly. A device operating at all times should be connected to its own serial port. | '''Note:''' You may connect other serial devices to the pass-through port of the CM17A serial Firecracker Interface; however, if the device operates all the time (mouse, modem, etc.), the Firecracker Interface will not operate properly. A device operating at all times should be connected to its own serial port. | ||
| + | |||
===Configuring the MR26A PC Receiver (also known as the Firecracker Receiver)=== | ===Configuring the MR26A PC Receiver (also known as the Firecracker Receiver)=== | ||
| + | |||
*Connect the MR26A PC Receiver to the pass-through port of the Firecracker Interface. | *Connect the MR26A PC Receiver to the pass-through port of the Firecracker Interface. | ||
*The red LED on the MR26A should light to confirm it is receiving power from the computer. | *The red LED on the MR26A should light to confirm it is receiving power from the computer. | ||
| Line 39: | Line 46: | ||
'''Note:''' These instructions apply if you have the CM17A serial Firecracker and MR26A serial Firecracker Receiver. | '''Note:''' These instructions apply if you have the CM17A serial Firecracker and MR26A serial Firecracker Receiver. | ||
| + | |||
===Software Installation=== | ===Software Installation=== | ||
| + | |||
*Connect to the Internet. | *Connect to the Internet. | ||
*Open the email you received from us containing the download link. | *Open the email you received from us containing the download link. | ||
| Line 47: | Line 56: | ||
*When the download is complete, close all programs, but '''remain connected to the Internet'''. In order to install and register MultiView, the computer must have an active Internet connection. | *When the download is complete, close all programs, but '''remain connected to the Internet'''. In order to install and register MultiView, the computer must have an active Internet connection. | ||
*Double click on the MultiView installation file you just downloaded. | *Double click on the MultiView installation file you just downloaded. | ||
| + | |||
Throughout the installation process, you will see the following windows: | Throughout the installation process, you will see the following windows: | ||
| Line 52: | Line 62: | ||
{| width="100%" | {| width="100%" | ||
|'''Welcome Window''' <br> Click Next to continue with the installation or Exit to abort. | |'''Welcome Window''' <br> Click Next to continue with the installation or Exit to abort. | ||
| − | | | + | |[[Image:tech_mv_install1.gif]] |
|- | |- | ||
|'''Destination Directory''' <br> If you wish to change the directory where the MultiView application files will be saved, navigate to the new location. When the new directory has been selected, or if the default directory is used, click Next to continue. | |'''Destination Directory''' <br> If you wish to change the directory where the MultiView application files will be saved, navigate to the new location. When the new directory has been selected, or if the default directory is used, click Next to continue. | ||
| − | | | + | |[[Image:tech_mv_install2.gif]] |
|- | |- | ||
|'''File Transfer''' <br>A few moments to transfer the files... | |'''File Transfer''' <br>A few moments to transfer the files... | ||
| − | | | + | |[[Image:tech_mv_install3.gif]] |
|- | |- | ||
|'''Install Hardware''' <br> Plug in the USB cable... | |'''Install Hardware''' <br> Plug in the USB cable... | ||
| − | | | + | |[[Image:tech_mv_install4.gif]] |
| + | |[[Image:usbconnection.jpg]] | ||
|- | |- | ||
|'''Installation Complete''' <br> ...and you are finished! Click OK to exit the installation. Restart Windows. | |'''Installation Complete''' <br> ...and you are finished! Click OK to exit the installation. Restart Windows. | ||
| − | | | + | |[[Image:tech_mv_install5.gif]] |
|} | |} | ||
| + | |||
| + | |||
==Graphical User Interface== | ==Graphical User Interface== | ||
| + | |||
| + | |||
===MultiView Graphical User Interface=== | ===MultiView Graphical User Interface=== | ||
| − | + | [[Image:tech_mv_gui.gif]] | |
| + | |||
'''1. Live Video Preview''' | '''1. Live Video Preview''' | ||
| Line 88: | Line 104: | ||
Clicking this button displays the Camera and Video Input Properties dialog box. | Clicking this button displays the Camera and Video Input Properties dialog box. | ||
| − | + | [[Image:tech_mv_cam1_tab.gif]] | |
| + | |||
The Camera One, Camera Two, Camera Three, and Camera Four tabs have the same options. | The Camera One, Camera Two, Camera Three, and Camera Four tabs have the same options. | ||
| Line 98: | Line 115: | ||
In the Motion Detection Settings section there are two options: | In the Motion Detection Settings section there are two options: | ||
| + | |||
*Option 1 sets the House/Unit code that will trigger MultiView to switch to the camera and start capturing images. | *Option 1 sets the House/Unit code that will trigger MultiView to switch to the camera and start capturing images. | ||
*Option 2 sets the delay between each captured image and the total capture duration. | *Option 2 sets the delay between each captured image and the total capture duration. | ||
| − | + | [[Image:tech_mv_video_input_tab.gif]] | |
| + | |||
The Video Input tab allows switching between various video capture devices. MultiView defaults to our USB Capture Cable. | The Video Input tab allows switching between various video capture devices. MultiView defaults to our USB Capture Cable. | ||
| − | + | [[Image:tech_mv_about_tab.gif]] | |
| + | |||
Use the About tab to find MultiView's version number, access the registration dialog box, or to load your Internet browser and visit our web site. | Use the About tab to find MultiView's version number, access the registration dialog box, or to load your Internet browser and visit our web site. | ||
'''6. Help''' | '''6. Help''' | ||
| + | |||
Click this button to load the online help file. | Click this button to load the online help file. | ||
'''7. Expand Your System - Click Here''' | '''7. Expand Your System - Click Here''' | ||
| + | |||
Clicking this link will load your Internet browser and direct it to the X10 web site. | Clicking this link will load your Internet browser and direct it to the X10 web site. | ||
'''8. Setup Firecracker''' | '''8. Setup Firecracker''' | ||
| + | |||
This button will load the Setup Firecracker dialog box. | This button will load the Setup Firecracker dialog box. | ||
'''9. Launch Firecracker''' | '''9. Launch Firecracker''' | ||
| + | |||
This button will load the [a href="tech_fc.htm"]Firecracker application[/a]. | This button will load the [a href="tech_fc.htm"]Firecracker application[/a]. | ||
'''10. Set Delay Between Cameras''' | '''10. Set Delay Between Cameras''' | ||
| + | |||
Use this section to set the amount of time that must pass before MultiView will switch to the next camera. | Use this section to set the amount of time that must pass before MultiView will switch to the next camera. | ||
| + | |||
| + | |||
==Configuring The Software== | ==Configuring The Software== | ||
| + | |||
This section covers testing MultiView's functions, as well as configuring the User Interface to your liking. | This section covers testing MultiView's functions, as well as configuring the User Interface to your liking. | ||
| + | |||
===Initial Configuration=== | ===Initial Configuration=== | ||
| − | + | '''MISSING INFORMATION''' you are using the CM17A Firecracker Interface and MR26A PC Receiver, shut down any programs that utilize a communications port (comport/serial port) to avoid any possible conflicts during the configuration process (i.e. PDA or digital camera software). | |
*Run the MultiView application (Start button | Programs | MultiView | MultiView). | *Run the MultiView application (Start button | Programs | MultiView | MultiView). | ||
| + | |||
MultiView Registration Dialog Box | MultiView Registration Dialog Box | ||
| − | + | [[Image:tech_mv_register_dialog.gif]] | |
| + | |||
*After MultiView has completed loading the Registration dialog box should appear. It can also be accessed by going to Settings | About | Registration Info... | *After MultiView has completed loading the Registration dialog box should appear. It can also be accessed by going to Settings | About | Registration Info... | ||
*To register MultiView, your computer must be connected to the Internet. | *To register MultiView, your computer must be connected to the Internet. | ||
*In the Registration Code box, enter the sales order number that contains your MultiView purchase. At the end of the sales order number, add '-1' (a hyphen and the number one). | *In the Registration Code box, enter the sales order number that contains your MultiView purchase. At the end of the sales order number, add '-1' (a hyphen and the number one). | ||
| + | |||
Example: If the sales order number has the format of XXXXXX (Internet order), the registration number is XXXXXX-1. If the format is XXXXXX-AAXXX (telephone order), the registration number is XXXXXX-AAXXX-1. X represents any number and A represents any letter. | Example: If the sales order number has the format of XXXXXX (Internet order), the registration number is XXXXXX-1. If the format is XXXXXX-AAXXX (telephone order), the registration number is XXXXXX-AAXXX-1. X represents any number and A represents any letter. | ||
| + | |||
*Click the Register Now! button. | *Click the Register Now! button. | ||
*The message box will display: "Sending Registration Request." MultiView contacts our server for registration. | *The message box will display: "Sending Registration Request." MultiView contacts our server for registration. | ||
| Line 159: | Line 192: | ||
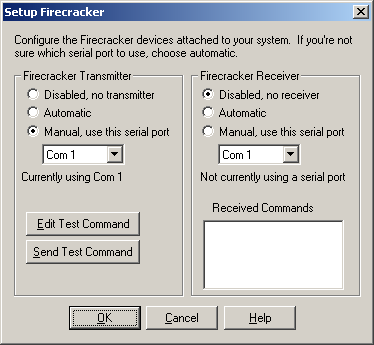
*Click the Setup Firecracker button on the main window. | *Click the Setup Firecracker button on the main window. | ||
*The Setup Firecracker dialog box appears. | *The Setup Firecracker dialog box appears. | ||
| + | |||
Setup Firecracker Dialog Box | Setup Firecracker Dialog Box | ||
| − | + | [[Image:tech_dialog_setup_fc.gif]] | |
| + | |||
*If you do not know the number of the comport the Firecracker is plugged into, choose the Automatic button in the Firecracker Transmitter section. | *If you do not know the number of the comport the Firecracker is plugged into, choose the Automatic button in the Firecracker Transmitter section. | ||
| Line 178: | Line 213: | ||
*Click on the Zoom Snapshots button. | *Click on the Zoom Snapshots button. | ||
*A new window appears and shows a larger version of the four Image Windows. As the cameras are cycled by MultiView, each Image Window will update. Clicking on the images in this window does not switch to the associated camera. | *A new window appears and shows a larger version of the four Image Windows. As the cameras are cycled by MultiView, each Image Window will update. Clicking on the images in this window does not switch to the associated camera. | ||
| + | |||
| + | |||
===Viewing Captured Images=== | ===Viewing Captured Images=== | ||
| + | |||
*To view saved images, go to My Computer | C: | My Images. Within My Images will be a folder whose name is the current year and month. | *To view saved images, go to My Computer | C: | My Images. Within My Images will be a folder whose name is the current year and month. | ||
*Open the folder. | *Open the folder. | ||
*Within this folder is another one whose name is the current date. Open it to view the captured images. You will need an image viewing program such as Adobe Photoshop or Internet Explorer. | *Within this folder is another one whose name is the current date. Open it to view the captured images. You will need an image viewing program such as Adobe Photoshop or Internet Explorer. | ||
| + | |||
===Motion Detection=== | ===Motion Detection=== | ||
| + | |||
The motion detection feature of MultiView can be used only if an MR26A PC Receiver or CM19A USB Transceiver is connected to the computer (if you have a CM19A, skip steps 2 through 7). If one is, and you own a HawkEye, EagleEye, or ActiveEye Motion Detector, the following instructions will show you how to configure MultiView to respond to motion. | The motion detection feature of MultiView can be used only if an MR26A PC Receiver or CM19A USB Transceiver is connected to the computer (if you have a CM19A, skip steps 2 through 7). If one is, and you own a HawkEye, EagleEye, or ActiveEye Motion Detector, the following instructions will show you how to configure MultiView to respond to motion. | ||
*Set the Motion Detector to an unused code. It is best to set it to a different House code than the camera. | *Set the Motion Detector to an unused code. It is best to set it to a different House code than the camera. | ||
Latest revision as of 20:11, 28 May 2014
Introduction
MultiView is a video snapshot system with camera control. Using our USB Video Capture cable and Firecracker Computer Interface, MultiView controls up to four wireless XCams and saves snapshots of each camera's output to a hard disk for viewing at a later time.
The following article covers the features of MultiView and its integration into an existing XCam system. It is assumed that an existing XCam system has already been installed and tested using a CR12A PalmPad remote or other controller. For instructions on configuring a single XCam, check the 'Related Articles' at the end of this article for setup instructions.
Hardware
Minimum X10 hardware required to use MultiView:
Once your cameras have been configured and tested, connect the RCA Video Out jack on the Video Receiver to one end of an RCA cable. Connect the other end to the RCA Video In jack on the USB Video Capture Cable.
Setup
Configuring the Firecracker Computer Interface
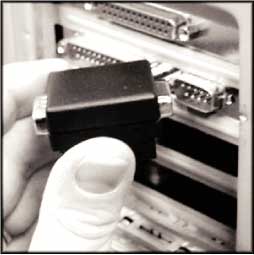
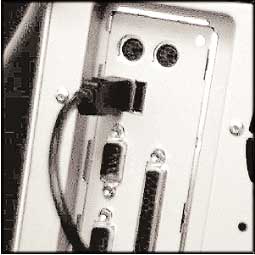
- If you have the CM17A, connect the female serial connector on the Firecracker Interface directly to your PC's serial port. If you have the CM19A, plug the USB connector directly into a free USB port on your computer.
- If you have the CM19A you can skip the following step. If you own an MR26A PC Receiver, it can be connected to the male serial port connector (pass-through port) on the Firecracker Interface.
- If the computer's case or other cables prevent the Firecracker Interface from connecting properly, you can purchase an extension serial cable from a local computer parts supplier.
Note: You may connect other serial devices to the pass-through port of the CM17A serial Firecracker Interface; however, if the device operates all the time (mouse, modem, etc.), the Firecracker Interface will not operate properly. A device operating at all times should be connected to its own serial port.
Configuring the MR26A PC Receiver (also known as the Firecracker Receiver)
- Connect the MR26A PC Receiver to the pass-through port of the Firecracker Interface.
- The red LED on the MR26A should light to confirm it is receiving power from the computer.
- If you have the CM19A transciever, when you plug it in the red LED on the front of it will not light. That LED will indicate when the unit is transmitting or receiving a signal.
Note: These instructions apply if you have the CM17A serial Firecracker and MR26A serial Firecracker Receiver.
Software Installation
- Connect to the Internet.
- Open the email you received from us containing the download link.
- Click on the link or copy and paste it into your browser's address bar.
- Once our download web page has finished loading, follow the instructions it provides.
- When the download is complete, close all programs, but remain connected to the Internet. In order to install and register MultiView, the computer must have an active Internet connection.
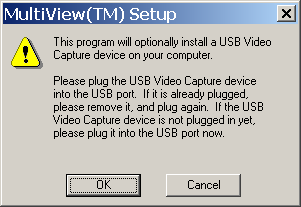
- Double click on the MultiView installation file you just downloaded.
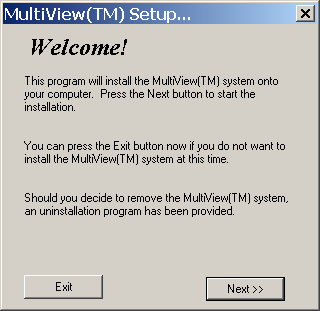
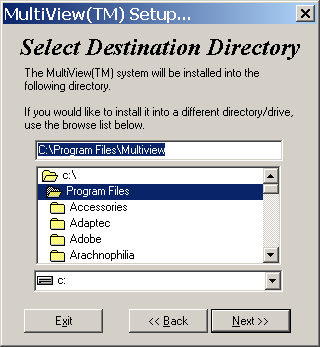
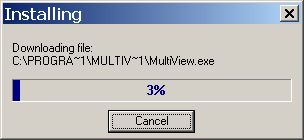
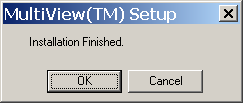
Throughout the installation process, you will see the following windows:
Graphical User Interface
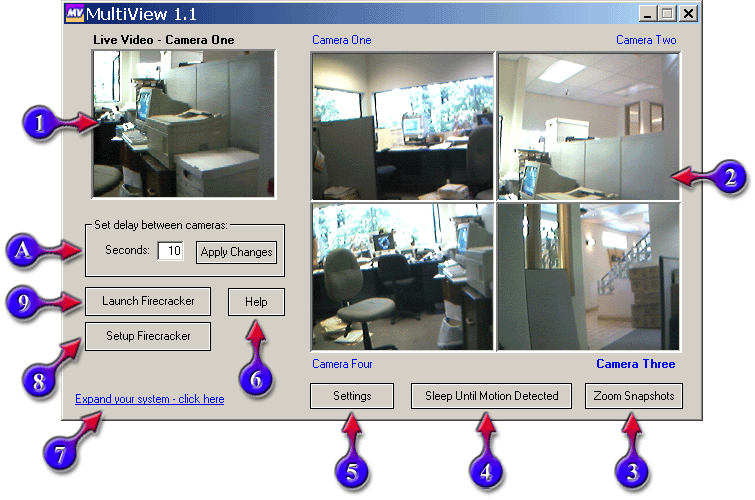
MultiView Graphical User Interface
1. Live Video Preview
This area displays the live video image received from the current camera. The text label above the pane lets you know which one is the active camera.
2. Image Windows This area displays the images of the four wireless cameras that MultiView controls. The image displayed for each camera is the last captured picture. When the text label for a camera pane is bold, it is the last camera to have captured an image. If one of the Image Windows is double clicked, a new, larger window is created to display that camera's video. MultiView will automatically switch the live preview to this camera, and image capture will be suspended until the zoom window is closed. Each window pane's label may be changed in the Settings dialog box.
3. Zoom Snapshots Clicking this button will open a new MultiView window, an enlarged view of all 4 camera snapshots. This window will be updated with snapshots as the cameras switch.
4. Sleep Until Motion Detected Clicking this button causes MultiView to stop capturing video and snapshots. It remains in a Stand-By mode until a signal is received from a motion detector. When this signal is received, MultiView switches to the camera associated with the motion detector and captures images as specified in [a href="#Settings"]Settings[/a].
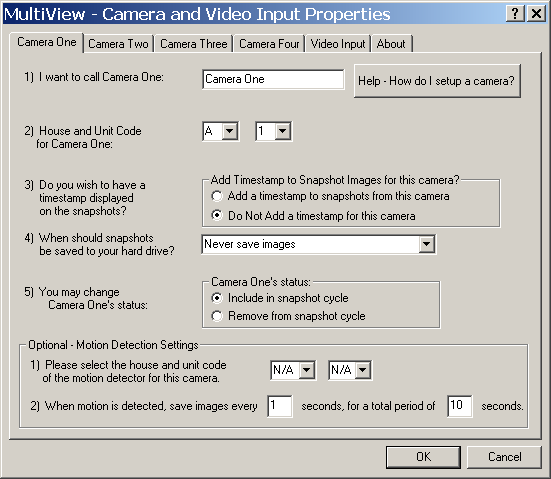
5. Settings Clicking this button displays the Camera and Video Input Properties dialog box.
The Camera One, Camera Two, Camera Three, and Camera Four tabs have the same options.
- Option 1 contains the name that will be displayed above or below the camera's Image Window.
- Option 2 shows the current House/Unit code that controls the related camera.
- Option 3 controls the time/date stamp that appears in the Image Windows.
- Option 4 determines when MultiView should save the captured images for the camera. The available choices are Always Save Images, Never Save Images, and Only Save Images When Motion Is Detected.
- Option 5 sets whether or not the camera is a part of the switching cycle.
In the Motion Detection Settings section there are two options:
- Option 1 sets the House/Unit code that will trigger MultiView to switch to the camera and start capturing images.
- Option 2 sets the delay between each captured image and the total capture duration.
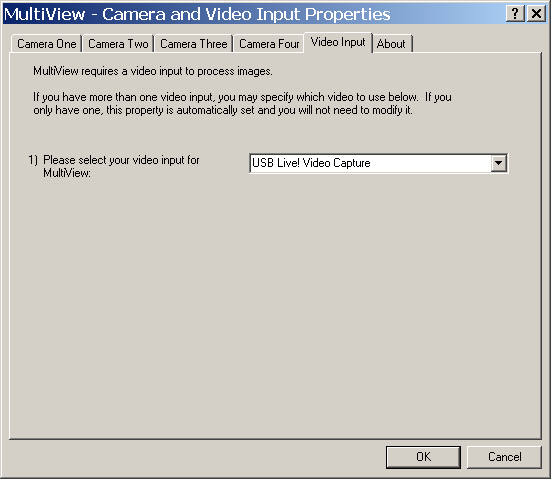
The Video Input tab allows switching between various video capture devices. MultiView defaults to our USB Capture Cable.
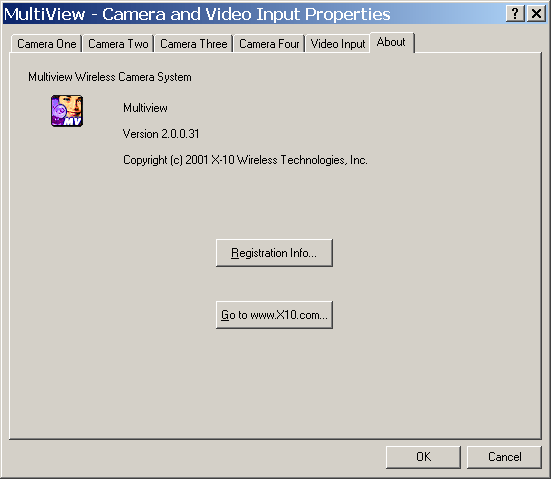
Use the About tab to find MultiView's version number, access the registration dialog box, or to load your Internet browser and visit our web site.
6. Help
Click this button to load the online help file.
7. Expand Your System - Click Here
Clicking this link will load your Internet browser and direct it to the X10 web site.
8. Setup Firecracker
This button will load the Setup Firecracker dialog box.
9. Launch Firecracker
This button will load the [a href="tech_fc.htm"]Firecracker application[/a].
10. Set Delay Between Cameras
Use this section to set the amount of time that must pass before MultiView will switch to the next camera.
Configuring The Software
This section covers testing MultiView's functions, as well as configuring the User Interface to your liking.
Initial Configuration
MISSING INFORMATION you are using the CM17A Firecracker Interface and MR26A PC Receiver, shut down any programs that utilize a communications port (comport/serial port) to avoid any possible conflicts during the configuration process (i.e. PDA or digital camera software).
- Run the MultiView application (Start button | Programs | MultiView | MultiView).
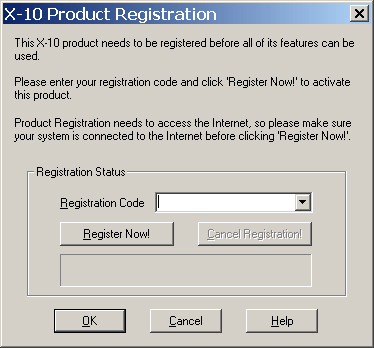
MultiView Registration Dialog Box
- After MultiView has completed loading the Registration dialog box should appear. It can also be accessed by going to Settings | About | Registration Info...
- To register MultiView, your computer must be connected to the Internet.
- In the Registration Code box, enter the sales order number that contains your MultiView purchase. At the end of the sales order number, add '-1' (a hyphen and the number one).
Example: If the sales order number has the format of XXXXXX (Internet order), the registration number is XXXXXX-1. If the format is XXXXXX-AAXXX (telephone order), the registration number is XXXXXX-AAXXX-1. X represents any number and A represents any letter.
- Click the Register Now! button.
- The message box will display: "Sending Registration Request." MultiView contacts our server for registration.
- After a few moments, the message box will read: "Product is registered!"
- Click OK.
- The Registration dialog box closes and returns you to the main window.
- Click on the Settings button.
- The Camera And Video Input Properties dialog box appears.
- Select the Video Input tab.
- Since you are using our USB Video Capture Cable, you should see USB Live! Video Capture selected in the Video Input selection list.
- Select the Camera 1 tab.
- For Option 1 change the camera name to "Cam A."
- For Option 2 change the House/Unit code to match the House/Unit code for the camera you wish to control.
- For Option 3 select the "Add a timestamp for this camera" radio button.
- For Option 4 select Always Save Images.
- For Option 5 select the "Include in snapshot cycle" button.
- In the Motion Detection Settings section, leave Option 1 set to "N/A" in both boxes. We will cover motion detection later.
- For each additional available camera (up to three additional cameras), configure the Camera 2, Camera 3, and Camera 4 tabs in the same manner as Camera 1. Rename each camera as Cam B, Cam C, and Cam D and match each to the appropriate House/Unit code of the camera they control.
- For any tabs without cameras, select the "Remove from snapshot cycle" button.
- Click the OK button. The Camera And Video Input Properties dialog box closes.
- Click the Setup Firecracker button on the main window.
- The Setup Firecracker dialog box appears.
Setup Firecracker Dialog Box
- If you do not know the number of the comport the Firecracker is plugged into, choose the Automatic button in the Firecracker Transmitter section.
- If you do know, select the Manual button and the correct comport.
- If you do not have an MR26A PC Receiver (also known as the Firecracker Receiver) connected to your computer, choose Disabled in the Firecracker Receiver section.
- If you do own an MR26A, click on Manual and choose the comport, just like the Firecracker Transmitter section.
- Click on the OK button to save your settings and return to the main window.
- If you have the CM19A PC Transceiver, then you need to configure Firecracker as "Disabled, no transmitter" and "Disabled, no receiver." The CM19A is a USB device, will work like the CM17A and MR26A together, and cannot be identified on a serial port.
- The Live Video Preview window displays each camera in the cycle according to the time specified in the Set Delay Between Cameras text box.
- Double-click on one of the four Image Windows
- A larger window appears. The camera that was already previewing will display; a few seconds later, the software switches to the image from the selected camera. Image capturing stops while this new window is open.
- Close the viewing window.
- Double-click on a different Image Window.
- The viewing window appears again, and a few seconds later MultiView switches to the camera associated with that Image Window.
- Close the viewing window.
- Click on the Zoom Snapshots button.
- A new window appears and shows a larger version of the four Image Windows. As the cameras are cycled by MultiView, each Image Window will update. Clicking on the images in this window does not switch to the associated camera.
Viewing Captured Images
- To view saved images, go to My Computer | C: | My Images. Within My Images will be a folder whose name is the current year and month.
- Open the folder.
- Within this folder is another one whose name is the current date. Open it to view the captured images. You will need an image viewing program such as Adobe Photoshop or Internet Explorer.
Motion Detection
The motion detection feature of MultiView can be used only if an MR26A PC Receiver or CM19A USB Transceiver is connected to the computer (if you have a CM19A, skip steps 2 through 7). If one is, and you own a HawkEye, EagleEye, or ActiveEye Motion Detector, the following instructions will show you how to configure MultiView to respond to motion.
- Set the Motion Detector to an unused code. It is best to set it to a different House code than the camera.
- In MultiView, click on the Setup Firecracker button.
- The Setup Firecracker dialog box appears.
- Press the HOUSE/ON button located in the Motion Detector's battery compartment.
- The red LED at the top of the Motion Detector flashes.
- A moment later, the ON command for the Motion Detector should be displayed in the Received Commands box in the Setup Firecracker dialog box. This confirms that MultiView is properly receiving commands.
- Click OK.
- Click Settings.
- Select the camera tab that you wish to activate with the Motion Detector.
- In the Motion Detection Settings section, change the selection lists in Option 1 to match the House/Unit code assigned to the Motion Detector.
- In Option 2, change the values to every 5 seconds and for a total period of 20 seconds.
- Click OK.
- Press the HOUSE/ON button on the Motion Detector.
- MultiView will detect motion. A new button will appear below the Setup Firecracker button which reads: "Motion Detected - You have Pics!" Also, above the Live Video Preview the words "Motion Detected" appear.
- Click on the new Motion Detected button to display the My Images folder. The button disappears.
- Navigate to today's folder to view the captured images.
- If you have additional Motion Detectors, repeat the steps above, assigning each one to a different code.
- If you want MultiView to wait until motion is detected before capturing images, click the Sleep Until Motion Detected button.
- Click it again if you would like to wake MultiView.
