Difference between revisions of "NEW H264 Camera Path Settings"
X10douglas (talk | contribs) (Created page with "==Question== '''How do I change the recording path on my H.264 AirSight camera?''' ==Answer== These options require ActiveX Controls. Currently Internet Explorer is the onl...") |
X10douglas (talk | contribs) |
||
| (4 intermediate revisions by the same user not shown) | |||
| Line 6: | Line 6: | ||
These options require ActiveX Controls. Currently Internet Explorer is the only browser that can utilize these options. | These options require ActiveX Controls. Currently Internet Explorer is the only browser that can utilize these options. | ||
| − | |||
| − | |||
| − | |||
| − | |||
| − | |||
| − | + | 1) Click the Windows START button | |
| − | + | 2) Then choose ALL PROGRAMS | |
| − | |||
| − | |||
| − | |||
| − | |||
| − | |||
| − | + | [[File:WINSTART2.png]] | |
| + | |||
| + | 4) Find INTERNET EXPLORER in the list | ||
| + | |||
| + | 5) RIGHT-CLICK to select RUN AS ADMINISTRATOR | ||
| + | |||
| + | [[File:WINADMIN.png]] | ||
| + | |||
| + | Click YES when prompted to "MAKE CHANGES" | ||
| + | |||
| + | [[File:UAC.png]] | ||
| + | |||
| + | Type your camera's IP ADDRESS in the address bar to log into your camera using '''THIS''' Internet Explorer window. | ||
| + | |||
| + | |||
| + | 6) Access the SETTINGS Menu from the SETTINGS tab at the top of your screen | ||
| + | |||
| + | 7) Click on the RECORD menu and choose LOCAL SETTINGS | ||
| + | |||
| + | 8) Click BROWSE next to RECORD PATH and choose the location on your hard drive you wish to record to. | ||
| + | |||
| + | 9) Return to the LIVE VIDEO tab | ||
| + | |||
| + | [[File:RECORDPATH.png]] | ||
| + | |||
| + | Tap the RECORD icon to begin recording to your hard drive. | ||
| + | |||
| + | [[File:H264RECORD.png]] | ||
Latest revision as of 17:55, 17 August 2016
Question
How do I change the recording path on my H.264 AirSight camera?
Answer
These options require ActiveX Controls. Currently Internet Explorer is the only browser that can utilize these options.
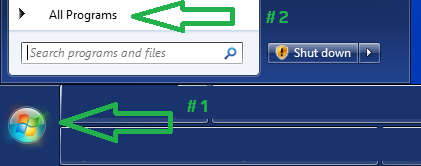
1) Click the Windows START button
2) Then choose ALL PROGRAMS
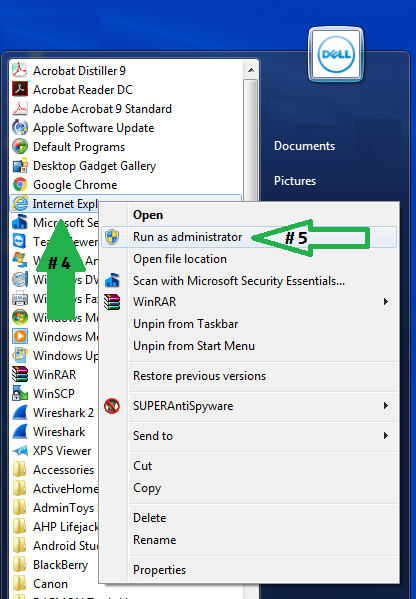
4) Find INTERNET EXPLORER in the list
5) RIGHT-CLICK to select RUN AS ADMINISTRATOR
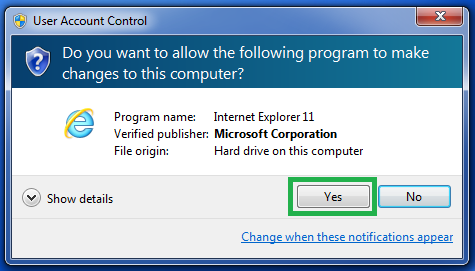
Click YES when prompted to "MAKE CHANGES"
Type your camera's IP ADDRESS in the address bar to log into your camera using THIS Internet Explorer window.
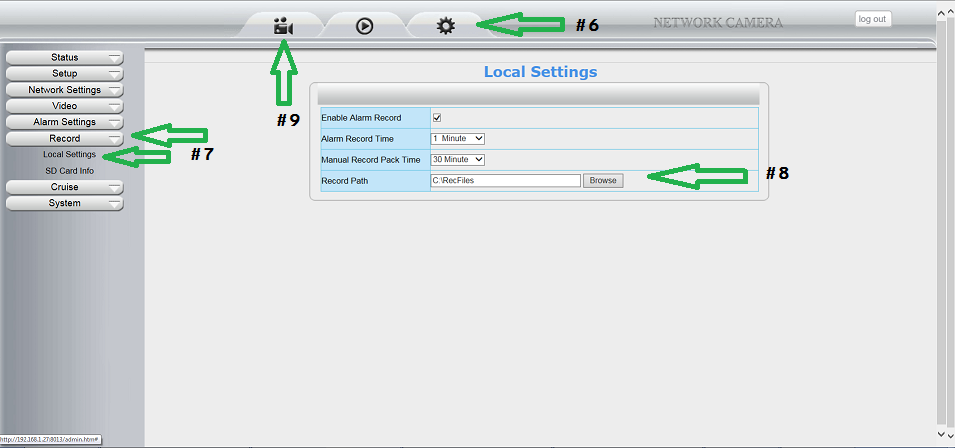
6) Access the SETTINGS Menu from the SETTINGS tab at the top of your screen
7) Click on the RECORD menu and choose LOCAL SETTINGS
8) Click BROWSE next to RECORD PATH and choose the location on your hard drive you wish to record to.
9) Return to the LIVE VIDEO tab
Tap the RECORD icon to begin recording to your hard drive.


