Difference between revisions of "MyGarage PRO"
Jump to navigation
Jump to search
| Line 9: | Line 9: | ||
Easy to configure! | Easy to configure! | ||
| − | #Wire the UM506 in parallel with the garage door opener | + | #Wire the DS10A to the garage door, press and hold its TEST button for a few seconds, then close the battery door. Verify that the LED on the DS10A blinks when the garage door opens or closes. If it does not, please [[Experiment With Magnet Placement]]. |
| − | # | + | #Wire the UM506 in parallel with the garage door opener. Set it to MOMENTARY and to a unique House and Unit Code. |
| + | #Plug the TM751 into a wall outlet, preferably one near the UM506. The TM751 receives the signals from the CM19A and transmits them over the power lines to control the UM506. | ||
#Connect the video receiver to the VA12A on the PC. | #Connect the video receiver to the VA12A on the PC. | ||
#Plug the camera in so it views your garage door. | #Plug the camera in so it views your garage door. | ||
| − | #Select the sensor for the garage door (DS10A) | + | #Add the camera, sensor and UM506 to the ActiveHome Pro software. |
| − | #Select the module that controls the garage door (UM506) | + | #Select the sensor for the garage door (DS10A). |
| + | #Select the module that controls the garage door (UM506). | ||
[[Image:MyGConf.jpg]] | [[Image:MyGConf.jpg]] | ||
Latest revision as of 21:41, 30 December 2010
Easy to setup!
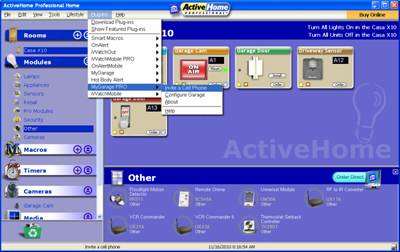
- Click on Plug-ins
- Go to MyGarage PRO
- Configure Garage
Easy to configure!
- Wire the DS10A to the garage door, press and hold its TEST button for a few seconds, then close the battery door. Verify that the LED on the DS10A blinks when the garage door opens or closes. If it does not, please Experiment With Magnet Placement.
- Wire the UM506 in parallel with the garage door opener. Set it to MOMENTARY and to a unique House and Unit Code.
- Plug the TM751 into a wall outlet, preferably one near the UM506. The TM751 receives the signals from the CM19A and transmits them over the power lines to control the UM506.
- Connect the video receiver to the VA12A on the PC.
- Plug the camera in so it views your garage door.
- Add the camera, sensor and UM506 to the ActiveHome Pro software.
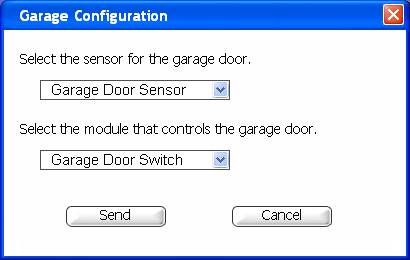
- Select the sensor for the garage door (DS10A).
- Select the module that controls the garage door (UM506).

