Difference between revisions of "NEW Fixed IP Address for P2P HD Cameras"
Jump to navigation
Jump to search
X10douglas (talk | contribs) |
X10douglas (talk | contribs) |
||
| Line 21: | Line 21: | ||
| − | [[File: | + | [[File:Port.jpg]] |
==Related Articles== | ==Related Articles== | ||
Revision as of 03:27, 12 January 2018
Question
How do I set my AirSight P2P HD camera to a fixed IP address?
Answer
We strongly recommend using the P2P Protocol utilized by the APP, which doesn't require any complex setup or port forwarding of the router to view your camera remotely.
If you prefer to instead setup it up from your PC you will need to first setup access to your camera via a web browser.
These settings will work for 99% of home routers. If you are not doing this on a home network, please check with your System Administrator for the correct settings.
- Login to the camera using the SearchIPCamTool - be sure to note down what IP address the SearchIPCamTool gives you.
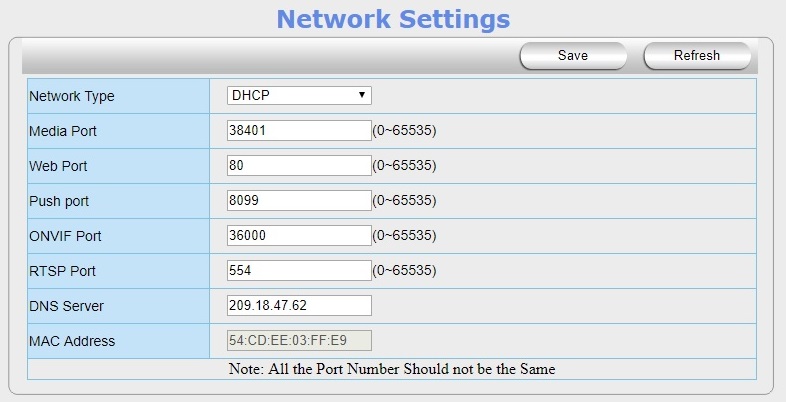
- Click on NETWORK SETTINGS then the IP menu
- Set the Network Type to Static Address.
- If you have more than one camera, or if your ISP blocks traffic on some ports, you will need to change the Media Port and Web Port. We recommend putting the first camera at 8001 and 9001, the second at 8002 and 9002, the third at 8003 and 9003, and so on.
- Do not change the ONVIF Port or RTSP Port
- For IP Address put in the SAME IP Address that the SearchIPCamTool reported.
- Put 255.255.255.0 for the Subnet Mask.
- Put the IP address, but with the last digit replaced with a 1, in both Gateway and DNS Server. For example, you should use 192.168.1.1 if the IP address was 192.168.1.23.
