Difference between revisions of "Four Camera System with XRay Vision Setup"
(Perl Automatic Add) |
X10douglas (talk | contribs) |
||
| (2 intermediate revisions by 2 users not shown) | |||
| Line 1: | Line 1: | ||
| − | + | ==Introduction== | |
| − | + | ||
| − | + | Your X10 multi-camera system allows you to control X10 XCam2 cameras from your PC and view each camera from the XRay Vision software. Follow these instructions to set up the necessary hardware and software. ''Note: You should have | |
| − | Your X10 multi-camera system | + | previously installed XRay Vision on your PC before starting these steps. |
| − | allows you to control X10 XCam2 cameras from your PC and view each | + | |
| − | camera from the XRay Vision software. Follow these instructions to | + | |
| − | set up the necessary hardware and software. | + | ==Setup== |
| − | ''Note: You should have | + | |
| − | previously installed XRay Vision on your PC before starting these | + | ===Set Up the Transceiver=== |
| − | steps. | + | |
| − | + | [[Image:tm751_close.jpg]] | |
| − | + | ||
| − | [ | + | |
| − | sure you have connected the | + | Make sure you have connected the transceiver module (model TM751) to a nearby power outlet. The outlet you use should not be too close to the back of your PC, as your PC may create some electrical noise that will reduce the range of the transceiver. Set the House Code (letter dial) on the transceiver to the letter you will use for your cameras. |
| − | power outlet. The outlet you use should not be too close to the back | + | |
| − | of your PC, as your PC may create some electrical noise that will | + | ===Connect the Firecracker Computer Interface=== |
| − | reduce the range of the transceiver. Set the House Code (letter dial) | + | |
| − | on the transceiver to the letter you will use for your cameras. | + | [[Image:cm17aconnection.jpg]] |
| − | + | ||
| − | the Firecracker Computer Interface | + | The Computer Interface (model CM17A) uses wireless signals to transmit X10 control commands from the computer to the transceiver module included in the kit. Connect the Interface directly to your PC's serial port. If there is already a device connected to this port, unplug it, connect the Computer Interface, and then plug the other device into the connector on the CM17A. Important: Do not plug your mouse into the CM17A! |
| − | [ | + | |
| − | Computer Interface (model CM17A) uses wireless signals to transmit X10 | + | ===Set Up Your Cameras=== |
| − | control commands from the computer to the transceiver module included | + | |
| − | in the kit. Connect the Interface directly to your PC's serial port. | + | Set the House and Unit code on the addressable power supply (model XM10A). All of the cameras should be set to the same letter (House) code, and each needs its own number (Unit) code. Plug the power supply into a free AC outlet. Connect its camera to the power supply. The camera should show on the TV. Adjust the antenna so that it points toward the antenna of the video receiver. |
| − | If there is already a device connected to this port, unplug it, connect | + | When the camera is set up, turn it off using your CR12A Camera Scanning Remote or other X10 remote. Repeat these steps for each camera you are setting up. Make sure to choose a different Unit Code for each camera. |
| − | the Computer Interface, and then plug the other device into the connector | + | |
| − | on the CM17A. Important: Do not plug your mouse into the CM17A! | + | {| width="100%" |
| − | + | |[[Image:xm_close.jpg]] | |
| − | + | |[[Image:xm_plug.jpg]] | |
| − | Set the House | + | |} |
| − | and Unit code on the addressable power supply (model XM10A). All of | + | |
| − | the cameras should be set to the same letter (House) code, | + | |
| − | and each needs its own number (Unit) code. Plug the power supply | + | |
| − | into a free AC outlet. Connect its camera to the power supply. The camera | + | ===Configure Your Cameras in XRay Vision=== |
| − | should show on the TV. Adjust the antenna so that it points toward the antenna of the video receiver. | + | |
| − | When the camera is set up, turn it off using your CR12A Camera Scanning Remote or other X10 remote. Repeat these | + | Run XRay Vision. Right-click in the Program window and choose "Settings," and then "Preferences" from the pop-up menu. Click on the "Cameras" tab in the configuration window. Click on the "Add" button to create an entry for a camera. Click on the "Camera Code" box and enter the House and Unit code for your first camera. Make sure to enter the letter and number without a space between them. In the "Comment" box you can type a description or name for this camera. Repeat these steps for all the cameras you set up earlier. |
| − | steps for each camera you are setting up. Make sure to choose a different | + | |
| − | Unit Code for each camera. | + | [[Image:xrv_cams.gif]] |
| − | + | ||
| − | + | You are now ready to control your cameras through XRay Vision. Right-click in the XRay Vision window and choose "Camera." You will be able to select from your different cameras, or tell XRV to automatically switch between all of them. | |
| − | Your Cameras in XRay Vision | + | |
| − | Run XRay Vision. | + | |
| − | Right-click in the Program window and choose "Settings," and then "Preferences" | + | |
| − | from the pop-up menu. Click on the "Cameras" tab in the configuration | + | ==Related Articles== |
| − | window. Click on the "Add" button to create an entry for a camera. Click | + | |
| − | on the "Camera Code" box and enter the House and Unit code for your first camera. | + | [[Multiple Camera System Setup]] |
| − | Make sure to enter the letter and number without a space between | + | |
| − | them. In the "Comment" box you can type a description or name for this | + | [[Troubleshooting Camera Switching]] |
| − | camera. Repeat these steps for all the cameras you set up earlier. | + | |
| − | [ | + | [[Multiple Cameras with One Video Receiver]] |
| − | You are now | + | |
| − | ready to control your cameras through XRay Vision. Right-click in the XRay Vision | + | |
| − | window and choose "Camera." You will be able to select from your different | + | |
| − | cameras, or tell XRV to automatically switch between all of them. | + | |
| − | Related Articles | + | [[Category:hardware]] |
| − | [ | + | [[Category:software]] |
| − | + | [[Category:frequently asked questions]] | |
| − | |||
| − | |||
| − | [ | ||
| − | |||
| − | |||
| − | |||
| − | [ | ||
| − | |||
| − | |||
| − | |||
| − | [ | ||
Latest revision as of 18:31, 28 May 2014
Introduction
Your X10 multi-camera system allows you to control X10 XCam2 cameras from your PC and view each camera from the XRay Vision software. Follow these instructions to set up the necessary hardware and software. Note: You should have previously installed XRay Vision on your PC before starting these steps.
Setup
Set Up the Transceiver
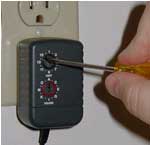
Make sure you have connected the transceiver module (model TM751) to a nearby power outlet. The outlet you use should not be too close to the back of your PC, as your PC may create some electrical noise that will reduce the range of the transceiver. Set the House Code (letter dial) on the transceiver to the letter you will use for your cameras.
Connect the Firecracker Computer Interface
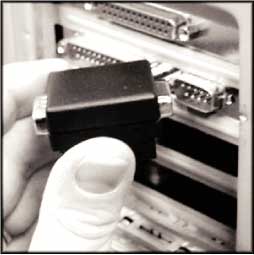
The Computer Interface (model CM17A) uses wireless signals to transmit X10 control commands from the computer to the transceiver module included in the kit. Connect the Interface directly to your PC's serial port. If there is already a device connected to this port, unplug it, connect the Computer Interface, and then plug the other device into the connector on the CM17A. Important: Do not plug your mouse into the CM17A!
Set Up Your Cameras
Set the House and Unit code on the addressable power supply (model XM10A). All of the cameras should be set to the same letter (House) code, and each needs its own number (Unit) code. Plug the power supply into a free AC outlet. Connect its camera to the power supply. The camera should show on the TV. Adjust the antenna so that it points toward the antenna of the video receiver. When the camera is set up, turn it off using your CR12A Camera Scanning Remote or other X10 remote. Repeat these steps for each camera you are setting up. Make sure to choose a different Unit Code for each camera.

|

|
Configure Your Cameras in XRay Vision
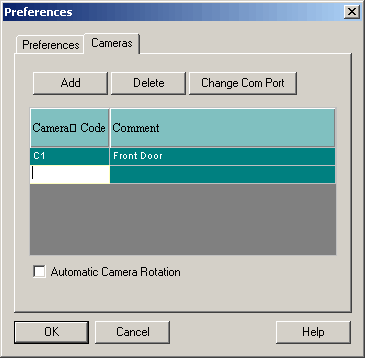
Run XRay Vision. Right-click in the Program window and choose "Settings," and then "Preferences" from the pop-up menu. Click on the "Cameras" tab in the configuration window. Click on the "Add" button to create an entry for a camera. Click on the "Camera Code" box and enter the House and Unit code for your first camera. Make sure to enter the letter and number without a space between them. In the "Comment" box you can type a description or name for this camera. Repeat these steps for all the cameras you set up earlier.
You are now ready to control your cameras through XRay Vision. Right-click in the XRay Vision window and choose "Camera." You will be able to select from your different cameras, or tell XRV to automatically switch between all of them.


