NEW AirSight SD Camera Email Setup
Jump to navigation
Jump to search
Question
How do I set up my NEW AirSight SD HD P2P camera to send email?
Answer
We strongly recommend setting up the email settings via the APP.
If you prefer to instead setup it up from your PC you will need to first setup access to your camera via a web browser.
- You will need the SMTP settings for the email address you want to use.
- Open the camera in Internet Explorer or the browser of your choice.
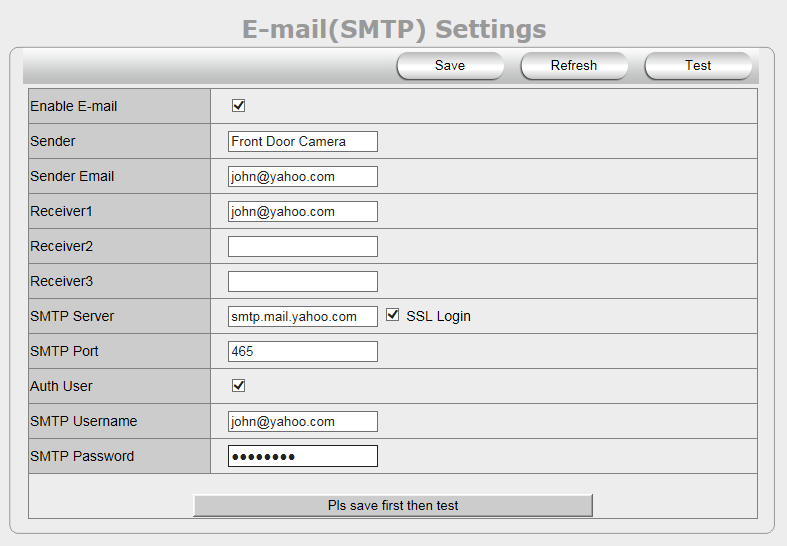
- Go into NETWORK SETTINGS then choose E-MAIL (SMTP) SETTINGS
- Check the box labeled ENABLE E-MAIL
- To enable the camera to send e-mail alerts when motion is detected - Use the examples below to fill in the information in this page.
- SENDER: The name you want to appear next to the outgoing email address, for example Front Door Camera
- SENDER EMAIL: The email address you want the camera to use to send emails, for example
john@yahoo.com - Receiver1, Receiver2, and Receiver3: Whoever you want the email to go to - you can have up to three different email addresses. You can use the same email address that you used in the SENDER EMAIL field, since you will most likely be sending this to yourself.
- SMTP Server: Use smtp.mail.yahoo.com for Yahoo Mail. Use smtp.gmail.com for Gmail. Use smtp.live.com for Hotmail.
- SSL Login: Check this box.
- SMTP Port: Try 465 or 587 for Yahoo or Gmail; use 587 for Hotmail.
- Auth User: Check this box
- SMTP User: For almost all email providers, you will need to enter your the email address here.
- SMTP Password: Enter the password that you use to log into the email account.
- Click SAVE.
- Click TEST.
If the test fails, double-check that all the information has been entered correctly.
If it still fails, check your email account for notifications of blocked emails due to security settings that may need to be adjusted.
- Please note the full text of the error message before contacting X10 support.
If the test succeeds, then your camera is successfully configured to send emails when the alarm is tripped.
